Quantcast
Channel: Photoshop – SLR Lounge
Viewing all 349 articles
Browse latest View live

The Difference Between Opacity & Flow In Photoshop

$
0
0

phlearn-photoshop-opacity-flow-brush-wacom-tablet-retouching-portrait-dodge-burn-4

When you’re trying to learn a skill (however long that road may be), there are just going to be certain pieces of advice, certain pieces of information, that will make much greater impacts than others. This is as applicable in learning languages, as it is in learning something like Photoshop.

If you speak English natively, but want to learn another Latin-based language, learning where pronouns and adjectives go, relative to your subject/noun in sentence structure, will take you far. If you want to be in the top one or two percent of all Photoshop users, to be in that percentile requires detailed knowledge acquired over time and likely, detailed study. But if you want understanding, the difference between Flow and Opacity, how each works, and when to use what, will really take you very far in your retouching.

phlearn-photoshop-opacity-flow-brush-wacom-tablet-retouching-portrait-dodge-burn-4

It’s just one of those things that’s so simple it often gets overlooked by beginners, but make no mistake that knowing how to wield the brush tool effectively, or indeed many other tools like the Clone Stamp or Eraser Tools, where flow and opacity can be adjusted, is a huge boon for your knowledge base. At their very root, they are just settings for the Brush Tool, which you’ll know is one of (if not the most), used tool in Photoshop, and refer to how the Brush Tool ‘paints’. The video below will explain how they work and when to use them in more detail, but here’s how Aaron Nace from Phlearn describes the two:

  • Flow allows you to build up ink over and over again.  A lot like ink on a piece of paper.  The more times you go over something with Flow as your setting while using your Brush Tool in Photoshop, the more ink you are building.  Imagine the effect a marker has on a piece of paper.  Every stroke lays down more.
  • Opacity is more of a computer generated way of painting.  If you painted a canvas with 50% Opacity, you couldn’t lay more ink down on your canvas until you picked up your brush and applied it again.  This method can be super useful in some cases, in others, it might be extremely limiting.

wacom-tablet-review-intuos-pro-photography-1-2

When you think of using the Brush Tool, especially if you’re a portrait shooter, understand that altering your Flow and Opacity settings are likely going to become the most frequently altered brush settings next to brush size. When retouching using the brush tool, especially for dodging and burning, I like to keep my Flow very, very low and build up gradually. This allows me to get the most natural effect without hard ‘lines.’

Typically, my Brush Tool settings are like below: Opacity at 100% and Flow at 2%, sometimes even lower. I also set up my pen settings to keep one of the shaft buttons for changing brush size and another for ‘Undo.’ This is what I find most effective for my workflow.

[REWIND: Intuos Pro – The Ultimate Retouching Tool Review]

phlearn-photoshop-opacity-flow-brush-wacom-tablet-retouching-portrait-dodge-burn

When it comes to dodging and burning, or balancing skin tones, there is no better friend to have, except maybe a pen tablet to help you make the most out of your tool. Any way you can get your hands on a tablet, even an old one, whether you have to beg, steal, or rent your pets, do it. Truly there is nothing that will be more beneficial to your retouching. There is just no way, as a photographer, to get near the most out of Photoshop without one, and you needn’t get the biggest, most expensive model. In fact, I typically advise photographers to get one that costs around $70, called the Intuos Pen & Touch Small, and you can read the review of it here. If you have the cash and want one you can keep for longer with all the tech, you can check out the Intuos Pro Small. But really, get one, and all of these wonderful Photoshop tips will have so much more impact.

As always, if you are a fan of Aaron’s teachings (and who isn’t?), be sure to check back here for updates, and follow along with Aaron on YouTube and Phlearn. You should also consider becoming quickly adept at Photoshop with the Phlearn Photoshop 101 & 201 sets as they are extremely comprehensive, and will have you quickly doing things with Photoshop you may have otherwise thought too complex, or didn’t even know you could do.

Source: Phlearn


Twirls: How To Do This Hot, New Photoshop Trend

$
0
0
PureEmotionsPhotographyBefore

Pure Emotions Photography

If you had told me a week ago that I could easily turn this gorgeous image we took of a Sikh bride into a digital art masterpiece, I would have laughed at you. Why?  Because despite my ability to utilize the tools necessary to edit people in Photoshop, I have never been able to paint or draw.  I’ve always admired abstract art, but it wasn’t possible for me to create it…that is, until now.

We turned that gorgeous bride into this abstract art after using a combination of filters in Photoshop.

PureEmotionsPhotographyAfter

Pure Emotions Photography

Twirls: A New Photoshop Trend

Twirling is on fire, especially if you’re a member of the Photoshop and Lightroom group on Facebook. Hundreds upon hundreds of images have been shared on social media this week featuring the techniques that create a Twirl.  Some will say that this technology has always been there and that it’s not new.  While this may be true, the trend worthiness of it certainly is, as most had never heard of it or knew how to create one.  They are addictive and super easy to do. The possibilities are limitless.

I created a video tutorial that shows step-by-step how I’ve created some of my own Twirls after just a couple of days of practicing them.  To play along with me while you’re watching the video, go ahead and open any photograph you’ve ever taken into Photoshop.

Step by Step Instructions on How To Twirl in Photoshop

1.) Open any image in Photoshop

2.) With your background layer selected, go to Filter – Pixelate – Mezzotint. Make sure your mode is set to “Medium Lines.” Press OK.

3.) With your background layer still selected, go to Filter – Blur – Radial Blur.  Amount (100) – Blur Method (zoom) – Quality (best). Press OK.

4.) Repeat step 3 as many times as you like.  I usually like to run it about 3 times.

5.) Duplicate your background layer.  Keyboard shortcut CTRL/CMD J. This will create a duplicate layer called “Layer 1” right above your background layer.

6.) Select your background layer.  Then go to Filter – Distort – Twirl.  In the Angle number box, you want to put in a positive value number.  Let’s put in 80 for now.  Press OK. You can always try different ones the more you experiment.

7.) Select Layer 1 above your background layer.  Then go to Filter – Distort – Twirl.  In the Angle number box, you want to put in a negative value number this time.  Let’s put in -80 for now.

8.) With Layer 1 selected, we want to change the blending mode of this layer. In your layers palette, right above Layer 1, you will see the word “normal.” Click on that and it will expand a variety of choices.  Depending on the colors and exposure in your image, will depend on which blending mode works best here. Click through the various options until you find the one you like the best on your image. I like Darken, Multiply, Lighten, Exclusion and Difference modes for Twirl art. But choose what works best for you.

9.) Flatten your image. You can stop here or work on it some more.

10.) To see more advanced tips on taking what you’ve just created to the next level, watch the video directly above this step-by-step guide. Have fun!

Sample Twirls I Created

Here are some Twirls created using the step by step methods shown above as well as some more advanced techniques featured in the video tutorial.

PureEmotionsPhotography2

Pure Emotions Photography

PureEmotionsPhotography3

Pure Emotions Photography

PureEmotionsPhotography4

Pure Emotions Photography

PureEmotionsPhotography5

Pure Emotions Photography

PureEmotionsPhotography1

Pure Emotions Photography

Submissions From the Twirls Contest

Since I personally learned about Twirls through the Photoshop and Lightroom group on Facebook, I thought it would be fun to run a contest on the group allowing members to vote for their absolute favorite image to be included in this article.  I had over 300 submissions and narrowed it down to these 30 images and then opened the vote to the community.

TwirlVoteCollage

1.) Anne Hughes 2.) Daniele Giordano 3.) Doug Kessler 4.) Fernando Sanin 5.) James Leason 6.) Rick Magnell 7.) Julie Pals 8.) Joni MacArthur 9.) Jolyne Harris 10.) Jim Mallard 11.) Jerre Stead 12.) Robert Sutschek 13.) Karyn Veltman 14.) Adam Young 15.) Paul Scearce 16.) Peter Divers 17.) Kaegan Wright 18.) Rosie Hall 19.) Pj Marr 20.) Clayton Robinson 21.) Jessica Wadsworth 22.) Rachael Kashner 23.) Jostein Vedvik 24.) Jody Seidler 25.) Sam Young 26.) Kim Ekstrom 27.) Marcy Pivin 28.) Nancy Lariviere 29.) Matt Crace 30.) Susan Wiles

Winning Image – With 70 votes, Kim Ekstrom’s image took 1st place

KimEkstrom

Kim Ekstrom

2nd Place  –  64 votes

DanieleGiordano1

Daniele Giordano

 Other Standout Twirls

After I ran the contest, I saw how much the Twirls were growing over the course of the next 24 hours as people learned more about using their blending modes and other methods to create more advanced, unique twirls.  These honorable mentions stood out to me!

Donna-Dee Williams

Donna-Dee Williams

AndresAcosta

Andres Acosta

JosteinVedvik-JasonSmith-SusanWiles

(Top Left) Jostein Vedvik (Top Right) Jason Smith (Bottom) Susan Wiles

I am a bit biased to Adam Young’s work.  He has created several Twirls utilizing additional tools in Photoshop such as Liquify to create unique facial structures in his twirls.  He was entry number 14 in our voting contest, but this image really stood out to me as well.  I am blown away by what this guy has been able to create!  Pretty wicked!

AdamYoung1

Adam Young

How We Can Utilize This Twirling Trend

Many are asking, “Is this a fad or is it profitable?” The truth is that it depends on your ability to think outside of the box and market it. How can you tie it into your brand or do you even want to? Perhaps you just want to create art and hang it on the walls of your own home or do it for fun and leave them as digital files on your hard drive.

Digital Abstracts can be used and sold for stock imagery, used on business cards, as a background for a website, as a screensaver or hung as wall art. Or what if you wanted to use both the original image plus the abstract together somehow? These Double Float Metal Prints from Bay Photo would be a gorgeous way to incorporate both pieces together!  You’re only limited by your imagination in both creating these Twirls as well as using them in your business if you so choose!

[REWIND: World Class Photographers & Digital Artists Take You Through The Creative Process]

PeterDivers1

Peter Divers

My Thoughts on Twirls and Twirling

I believe that twirls will stick with some people, like myself, who have always felt incapable of creating something like this using canvas and paint but longed to do so.  I see this as a way for me to express myself through how a piece makes me feel.  Some of my clients would most likely love these, especially used in the double float mount metal prints with the original image on top.  I have connections with several doctors’ offices that I haven’t been able to put any of my work up in because their specialty is Sports Medicine or Counseling. My wedding, maternity and baby imagery would look out of place in their offices.  But, this abstract art could be hung in any of those locations.  I am dialing my contacts first thing Monday morning.

Will this be a fad to some people? Yes.  But as for me, I think it’s amazing because I finally get to do something I’ve always wanted to do. If you want to share your twirls with other people who also are obsessed with them, join the new Facebook group, Twirl On! that was created just for twirling. Have fun and share your thoughts in the comment box.  If you have a favorite from the contest, tell us what image you would have picked to win.

Photoshop Tutorial | Secret Tip For Nailing White Balance With Ease

$
0
0

photoshop-tutorial-raw-white-balance-AWB-Lightroom-photography-slrlounge-7

Getting correct white balance has to be the absolute bane of my digital photography life. I just find it irritating that cameras don’t get this right every time, and yes, I’m aware of what a prat I’m being. At the times, I’m not using a grey card, clearly for more casual shooting, I still try to fiddle with the white balance settings to get a result as accurate as possible, even when shooting RAW. That is why I love cameras like the Nikon D750 and Sony RX1R for their ability to pretty much hit accurate WB no matter the surrounding you throw at it.

However, aside from using a grey card or something like an Expo Disc, I find getting the most correct WB is something I have to achieve in post. Whatever photo post processing program you’re using will almost certainly have a way for you to ‘fix’ white balance, and using the eye dropper WB tool in Lightroom or Adobe Camera Raw can be quite effective. Using them is generally a step in the right direction, but not typically a big enough step.

photoshop-tutorial-raw-white-balance-AWB-Lightroom-photography-slrlounge

So what to do? The team over at Graphics Geeks have put together a short video breaking down a rather brilliant and unique way of getting just the right white balance using Photoshop. This is done using a grey point within the mid-tones, as it is in this range where you’ll find more color accuracy, which is, essentially, why we would generally use a 50% grey card. But, if you don’t have one, here’s how to find that point:

  • Create a new layer which you’ll fill with grey by selecting Edit>Fill>50% Grey. You’ll at this point change your blending mode to ensure it is set to ‘Difference.’photoshop-tutorial-raw-white-balance-AWB-Lightroom-photography-slrlounge-2
  • Create a new Threshold adjustment layer and make sure it is at the top of the stack. At this point, you’ll drag the slider almost entirely to the left whereby you’ll find only a few areas will be highlighted in black. It is these areas within your image that are closest to an actual 50% grey.photoshop-tutorial-raw-white-balance-AWB-Lightroom-photography-slrlounge-4
  • With the Color Sampler tool selected, you will now click the center of one of those areas which will save as a sample point. They suggest choosing one directly lit by your light source.
  • Hide the Grey and Threshold layers and select the curves adjustment layer. Once selected, you’ll select the grey point pipette and use it on the sample point you just saved in the previous step.

That’s pretty much it. All you should do at this point is remove the color sampler point by selecting the Color Sampler tool and clicking ‘Clear’ at the top bar.

[REWIND: Why You Need A Tablet & How It’ll Transform Your Lightroom Workflow]

photoshop-tutorial-raw-white-balance-AWB-Lightroom-photography-slrlounge-6

Those of a pedantic persuasion, will no doubt argue that, while interesting, there are ‘easier’ and more accurate ways to ensure a proper white balance; that using a 50% gray card, or an Expo Disc will give a bullseye every time. Or that using a dropper tool within Lightroom is just a much easier route to take. They would be right to a degree if you squint, but if you open your eyes, you’ll realize that this is going to be most useful when you haven’t had your gray card in a test shot because you either forgot it or were shooting spur of the moment.

And regarding Lightroom, I can tell you that finding a grey point within Lightroom isn’t always easy, nigh possible. Through my own tests I’ve found this to be a very effective way to save an image from a terrible WB, and generally more accurate than in LR. If it seems like a lot of steps, I wouldn’t be put off, as in practice, it actually takes little to no time at all. Frankly, I just made a Photoshop Action to do the first steps with a single click.

You can find more from the Graphics Geeks here on their YouTube site.

Source: Graphics Geeks, Images are screen captures from featured video

How To Stretch Images & Extend Backdrops In Record Time In Photoshop

$
0
0

photoshop-phlearn-tutorial content-aware-landscape-studio-background-photography-slrlounge-4

Content Aware Scale has got to be one of the more brilliant tools available to photographers today. If you’re a budding photographer with little to no budget for a studio, you won’t necessarily have the size of background you’d like for certain shots, and extending it in post is a tedious, soul crushing event,  if you’re going to use the clone stamp. Frankly, if you’re a landscape shooter or any other type, you could probably benefit from a simpler way to extend your images without the nightmare that is the clone stamp tool used over a large space.

This is where Content Aware Scale can come in. Some months back I posted a tutorial on the Photoshop Crop Tool, which goes unrecognized for just how useful it actually is. With it, you can fix a tilted or misaligned image. I also showed how you could use the tool to ‘expand’ an image using Content Aware, which, incidentally, can allow you to turn a landscape oriented image into a portrait oriented image, or vice versa.

photoshop-crop-tool-landscape-aerial-thunderbirds-f16-viper-england-devon-sheepstor-USAF-photography-aviation-FEATURED

In the video herein, Aaron Nace and the Phlearn team has put together a tutorial showing this very process, and going a step further by explaining how you can avoid the warping of items in your image that you don’t want distorted during the ‘Extend’ process – ensuring their protection. This essentially is just a matter of making a selection of what you want protected, and loading it as a channel, which Aaron walks you through.

In the video tutorial, you’ll see that all there really is to this is using the crop tool to extend the borders/parameters of your image, then going to Edit>Content Aware Scale, and viola.

Almost.

photoshop-phlearn-tutorial content-aware-landscape-studio-background-photography-slrlounge-3

[REWIND: WHY YOU NEED A TABLET & HOW IT’LL TRANSFORM YOUR LIGHTROOM WORKFLOW]

It warrants saying here that while it will work as ‘advertised’ you should know that Content Aware isn’t entirely aware of your desires, and thus, doesn’t always know where to stop, or is incapable of extending as much as you like – or as flawlessly as you’d like in one go. However, you can still work incrementally and have it be exponentially faster, and likely more seamless, than if you were to use the clone tool. Generally, just extend a third or so of the distance you want, use content aware, and then start again and all should be well. This is also going to work best with images that don’t have very cluttered backgrounds.

As always, if you are a fan of Aaron’s teachings (and who isn’t?), be sure to check back here for updates, and follow along with Aaron on YouTube and Phlearn. You should also consider becoming quickly adept at Photoshop with the Phlearn Photoshop 101 & 201 sets as they are extremely comprehensive, and will have you quickly doing things with Photoshop you may have otherwise thought too complex, or didn’t even know you could do.

Source: Phlearn

Photoshop On-The-Go | Adobe To Drop New Mobile Photoshop & Astropad Gets Even Smaller

$
0
0

photoshop-mobile-astropad-wacom-intuos-lightroom-retouching-photography-slrlounge-7

Like Kleenex is to tissues, Photoshop is the eponymous name when we think of photo manipulation. It has, however, generally been the reserve of the technologically, artistically, and photographically inclined. You just don’t find the average person using it, and that’s for a plethora of reasons; it’s pricey, it requires lots of time and practice to understand and utilize well, and generally you’re tied to a desk when you use it. This doesn’t bode too well for a world that’s anything but stagnant. To reach and keep an audience now, there’s got to be convenience and freedom of mobility, and many companies are trying to find the right way to approach this, and Adobe being one.

This October at the Adobe MAX Conference, Adobe is slated to introduce the newest iteration of Photoshop and it’ll be a mobile one. ‘Huzza!’ you may exclaim, but probably only if you’re not a prolific user of the software, in whose case this news is probably met with all the interest a raised eyebrow can convey.

photoshop-mobile-astropad-wacom-intuos-lightroom-retouching-photography-slrlounge-3

The thing is we’ve heard it before, and Adobe has even released mobile Photoshop versions prior (read: the horrid Photoshop Touch), and frankly, they’ve been rather crap, pleasing neither the pros not the average consumer. It was news in brief, at best. This though, tentatively named ‘Project Rigel’ is apparently aimed at filling the gaps. Manu Anand, Adobe’s Senior Product Manager had this to say,

Project Rigel is designed and built in a way that serves the needs of professionals familiar with retouching tools on the desktop, but more so for people not familiar with Photoshop tools like content-aware fill or spot healing…It democratizes them and makes them easier to use.

Democratize is an interesting choice of words, because by definition then, it will try to please the larger target market, and if I had to guess, that would be the market Adobe has yet to capture – the amateur/casual user. The user that wants to make images on the commute and good enough to fit within the restraints of Instagram. It’s understandable, of course, as Adobe is a business that wants to make money, and can only do that by adapting to the trends (sort of).

photoshop-mobile-astropad-wacom-intuos-lightroom-retouching-photography-slrlounge-2

The new app will be released for iOS devices first, and Android second, as it should be, ahem. It’ll also be free, but suspected that it will come as part of the Creative Cloud membership (now nearing 5 million), as a way to lure others in, perhaps with the promise of easy back and forth handoff from the more powerful desktop versions. So what can it do? There are the usual suspects like crop and vignette, but now there’s healing, smoothing, painting, and every wanna-be Kardashian’s favorite, the liquify tool. No word yet on just how the layers will work if at all, but it would seem moronic not to have some layer functionality.

[REWIND: ASTROPAD | TURN YOUR IPAD INTO A WACOM CINTIQ-LIKE GRAPHIC TABLET FOR $20]

photoshop-mobile-astropad-wacom-intuos-lightroom-retouching-photography-slrlounge-11

And if you had any doubt that mobile photo editing is going to become more and more mainstream, might I remind you of an app called Astropad which I wrote about a some fortnights ago now. It essentially aimed to turn your iPad into a Wacom Cintiq-like retouching surface for about $20. It’s an app built for creatives of all sorts that allows the iPad to be used as an interactive graphic tablet with any Mac app (no drivers needed). It’s all down to it being powered by a technology called Liquid. that keeps iPad colors true to source, uncompressed live-view image quality, GPU-accelerated for speed, and gets 60fps with USB cable for smooth fluid responsiveness. It sounded brilliant, though to mixed reviews.

photoshop-mobile-astropad-wacom-intuos-lightroom-retouching-photography-slrlounge-9 photoshop-mobile-astropad-wacom-intuos-lightroom-retouching-photography-slrlounge-13

There was a lag for many, and those used to a Wacom knew there was no replacing it with this. It did however have some success as a back-up, and no doubt the next iteration will be even better. Hopefully that will come soon, but, understanding that not everyone has an iPad, but loads more have iPhones, there is now Astropad for iPhones. It may seem a bit ridiculous to retouch on a surface so small, though I should mention that when I use a Wacom I shrink the active area down to a size smaller than my iPhone 6 screen…so maybe there’s some use in a bind? Would you use it?

I still will always be one to suggest a Wacom to you, and if price is a concern then understand you can get a Wacom Intuos Pen & Touch Small for around $70 which is well worth it, and what I move around with. You can see my full review on that here, or it’s massive pro brother the Intuos Pro Large here.

Sources: Astropad, CNET

An Excellent Way To Remove/Reduce Noise From Your Images

$
0
0

noise-reduction-photoshop-median-stack-mode-tourists-photography-slrlounge-3

You know what’s sexy? Not Photoshop, but like the nerdy guy with a larger than average, ahem, IQ, what it can do is impressive still. Combining modern camera sensors and what they are capable of doing, with the power of Photoshop makes for an incredibly powerful tool.

Median Stacking is one of those things that make you sort of sit back and marvel, and many of you may know it as a process probably most generally associated with removing tourists from landscape images. The concept is simple, but that Photoshop makes it so simple to execute is what’s astounding. If you’re not traveling a lot and are not a landscape shooter, you may never find much need for this process for the purpose described above. However, it can be used to great effect as a treatment for a photographic ailment known to all – noise.

noise-reduction-photoshop-median-stack-mode-tourists-photography-slrlounge-2

If you were shooting digital SLRs from the early 2000s, and even up to 3 to 4 years ago, the fact that ISO could be bumped up to some astronomical number didn’t matter a helluva lot to you because you knew that pushing past 400 was going to yield noisy, undersaturated images. I can hear some of you hark that at 800 ISO or even 1600 you may be fine, but even today shooting on a D610 or D750 that’s about was far as I like to push it for publishable images unless for some creative result.

There is no shortage of tools to reduce noise, and even Lightroom’s sliders do a pretty good job of it, but median stacking produces better results. Yes, the same technique used to remove tourists from tourist sites can be used to drastically reduce noise, and Andy Astbury shows how it’s done. Granted, it’s not going to do much for you if you’re not shooting stills, but it’s effective enough to know how to do for applicable times.

noise-reduction-photoshop-median-stack-mode-tourists-photography-slrlounge-4

noise-reduction-photoshop-median-stack-mode-tourists-photography-slrlounge-5

After. You’ll see how huge of a difference this makes once you try it

[REWIND: How To Stretch Images & Extend Backdrops In Record Time In Photoshop]

How’s it done? Simply take multiple shots of the same scene and load them into Photoshop, ensuring they’re as alike and aligned as possible. Once the basics have been dealt with, combine all image layers into a single smart layer and use Median Stack Mode (Layer>Smart Objects>Stack Mode>Median) settings to sort/average out the excessive noise. (It’s really that simple. The video is 15 minutes long, and yes could probably be compressed down to two, but worth your time).

*While we share his tutorial, we do not share the sentiment expressed regarding people at the start of the video. It’s around the 1:10 mark to about 1:15, so you can skip it.

Source: ISO 1200

Magnum Photos Darkroom Magic | The Genesis Of Photoshop & Lightroom

$
0
0

bresson-cartier-lightroom-darkroom-magnum-photos-james-dean-hepburn-photography-slrlounge-7

I love a good critic, and probably because they’re so rare. Haven’t you noticed? That most critics in any field are typically uninformed, and likely you’re able to peel their arguments like a banana. As a photographer, and one who can sometimes be found instructing on retouch, one of the most common irritants I hear from benighted critics is that photos can’t compare to film, because film wasn’t adjusted and ‘photoshopped.’

This is fine and understandable from those outside our field, but when vocal photographers say it, I tend to roll my eyes back into another dimension. If you’re going to be in photography, even if you don’t shoot film, a little historical education and appreciation will go far, and a way to – how shall I put this? – genuflect, to the ones who paved the way. *Note: I’m not suggesting to become the photographic equivalent of that tool at a restaurant who turns his nose up at a $30 bottle of wine because…

The fact is, Photoshop and Lightroom tools today had their genesis in the darkroom, and you may have heard this before, but it’s wonderful to see it happen, almost magical. It’s also impressive, and likely to breed a new appreciation for photos old and new, because then and now, skill and talent are required to adjust an image, as well as the right tools. It was just such a more organic and more difficult endeavor then.

bresson-cartier-lightroom-darkroom-magnum-photos-james-dean-hepburn-photography-slrlounge-6

Magnum Photos is a photographic co-operative and living archive of images from around the world, from the best photographers, with over a million photos in print and transparency covering people and events and anything dating back from the Spanish Civil War. As Magnum itself says, if you come across an iconic image, but you can’t think who took it or where it is to be found, there’s a good chance it came from Magnum. And currently there is one man as the master printer who brings the iconic negatives to fruition, and he has become a icon in his own right. His name is Pablo Iniro.

Magnum is a community of thought, a shared human quality, a curiosity about what is going on in the world, a respect for what is going on and a desire to transcribe it visually. – Henri Cartier-Bresson

Iniro is blessed in the sense that he is able to become intimately acquainted with the type of images and negatives from the type of photographers that the rest of us cretins can only dream of. Dennis Stock’s shot of James Dean in Times Square? Thomas Hoepker’s image of Mohammed Ali fist-to-camera? They’re here, and Iniro brings them to print. The process is delicate and intricate, equal parts art and science, and the methods are what inspired the retouching tools we use all day. Seeing his heavily and meticulously marked up prints gives a look into just how much thought and work is given to each print.

bresson-cartier-lightroom-darkroom-magnum-photos-james-dean-hepburn-photography-slrlounge

It’s not easy to make out what the writings are, and even if it was clear, it very well may be in a darkroom language specific to him, but it is easy enough to pick out the sections that denote timing and what needs to be dodged and burned and how much.

The Literate Lens’ Sarah Coleman has written about Iniro’s darkroom processing and her words I’m sure will reflect the thoughts of many of you,

Over the last fifteen years, almost every photographer I’ve interviewed has waxed poetic about that “magical” experience of seeing an image develop in chemicals for the first time. You have to wonder whether today’s young photographers will rhapsodize as much about the first time they color-calibrated their monitors.

Maybe, maybe not, but it does bring about a few questions. To achieve the same effects in digital is much easier, quicker, the tools more readily available, and able to be transported. In a sense, the challenge of altering an image isn’t near the same. So do we find value in something where there is little challenge? Do we appreciate something because it can be done, or only when it can be done with difficulty?

[REWIND: AN EXCELLENT WAY TO REMOVE/REDUCE NOISE FROM YOUR IMAGES]

bresson-cartier-lightroom-darkroom-magnum-photos-james-dean-hepburn-photography-slrlounge-4

After all, it was a necessity to have a dark room, all the chemicals, the enlargers, maybe some Ektachrome Duplicating film. You had to moderate it all, and even temperature differences in the room could affect the temp of the chemicals, and thus the time required for the chemicals to work. There was no ‘undo’ keys to hit, mitigating the ability to create minute and repeated adjustments at the press of a button, and then to print multitudes of copies with the click of another.

Now, some of you may be thinking that only dodging and burning was done in the darkroom, and there’s more that can be done now. There’s no argument there that possibilities today are endless, but then I would direct you to have a look at the work of Jerry N. Uelsmann, and you’ll likely change your mind about what you thought was possible with film; Jerry clearly didn’t think the final image needed to be tied to what was within the single negative, and created his visions with totally analog tools.

So, there you have it. It may be that the sweet ain’t as sweet without the bitter, and man, are these final images sweet.

If this has inspired you to make the most out of the tools we have available today, and you want to just become a Lightroom savant, I think it pertinent to tell you that there’s no better way to do that than with the Lightroom Workshop. It’s worth your time and will save it in the future.

Source: Magnum Photos, Gizmodo, The Literate Lens

StyleMyPic Photoshop Pro Workflow Panel | Pro Retouching & Beginner Use

$
0
0

stylemypic-photoshop-panel-retouch-adobe-slrlounge-photography-25

Photoshop is THE ubiquitous retouching program, even amidst the rising popularity of Capture One and Lightroom’s broad grip. There are just things Photoshop enables a user to do that the others simply can’t, and it’s so good at it, it’s unlikely the others will (Affinity users may object). The fact is, the images you are bombarded with on a daily basis are highly unlikely ever raw images, and have been put through some sort of processing. If you want your images to look like many of the ones you admire, well, you’re going to need Photoshop.

Now that it’s more readily affordable than ever, given the Creative Cloud subscription plan, there’s no reason not to have it and use it well. Doing the latter, however, typically requires some learned skill in its use, and the first thing a new user will be is intimidated, and rightly so. Photoshop does require a learning curve and will be more difficult for some than others, but saying that you should still do it. There is, however, some help.

stylemypic-photoshop-panel-retouch-adobe-slrlounge-photography-17

Depending on your level of experience within PS, you’ll likely have come across Photoshop Actions and plug-ins, as the two have become utterly commonplace in the market both paid, and free. Actions and plug-ins and scripts are all great, but are limited, unless you know some code. Thankfully, there are some good professional plug-ins out there, and StyleMyPic Photoshop Pro Workflow Panel is one.

What Is The StyleMyPic™ PRO WORKFLOW Panel?

Simply put, it’s a collection of scripts that cover many of the bases of quality retouching, making for a quicker, and in some cases, easier workflow. If you think this is anything like Portrait Professional, then you’re on the wrong track. Whereas those pre-packaged solutions take the creativity out of your hands, this only aims to help you achieve your creative vision regardless of skill level.

stylemypic-photoshop-panel-retouch-adobe-slrlounge-photography-28 stylemypic-photoshop-panel-retouch-adobe-slrlounge-photography-26

StyleMyPic™ PRO WORKFLOW is a Photoshop® extension Panel, designed to meet Pro Quality demands with beginner Ease of Use

That’s the marketing pitch, and it’s quite on point. Being familiar with other plug-ins and panels, the first thing that struck me about the panel is its rather simplified layout, making it an intuitive tool for even total neophytes. It’s actually broken down in such a way that it guides you step-by-step in the process, which can teach you some good retouching etiquette.

For example, the first section of the panel deals with reshaping and global adjustments, followed by a section on skin retouching, then color grading, then a tool kit when you need to make local adjustments like dodging and burning or sharpening and tone mapping, and a few artistic options between. This layout is very similar to how I do my own manual layouts, and as a new user, all you have to think of doing is starting from the top, and following the prompts to the next steps, all the way through.

stylemypic-photoshop-panel-retouch-adobe-slrlounge-photography-9

Of course, the more advanced users will tire of this prompting and as such they can be turned off, but the text on the prompts itself act as a mini instruction booklet, which you’ll no doubt appreciate.

What is utterly necessary to understand about retouching is that you already have an idea of what you need to do to make the image as you want it; a nip or tuck there, evening out of the skin tone here, a dash of color here, and on and on. It’s really the manipulation of the software that gets people confused, and a panel like this does that lifting for you. In your mind, you know your portrait is in want of some smoothing but you don’t know how to set it up in Photoshop – the panel requires a hit of the descriptive button to set it up, and you simply manipulate the mouse to apply the effect. That’s really the purpose of this panel, to simplify and speed up your workflow.

The Skin Retouch Pro is based on a modified version of frequency separation. Unlike traditional frequency separation, this version provides full control over the blur and texture frequency, even after applying the technique. This results in amazing but natural looking skin, within minutes

stylemypic-photoshop-panel-retouch-adobe-slrlounge-photography-16

[REWIND: SHOOT LIKE THE PROS WITH BASIC GEAR | PATRICK DEMARCHELIER]

What’s Included?

As alluded to above, Photoshop’s interface is really the primary hindrance for most people who use it. It hasn’t changed much since birth, and while incredible, to tap that capability you must know how to navigate through all the various menus and submenus which often use a language that’s either non-descriptive, alien, or just not as you’d think it. The StyleMyPic Panel is a direct approach.

Skin Retouch Pro

This is the second section of the panel and where you’ll likely get the most use. It’s essentially made up of a set of retouching tools and two custom actions for use in either 8 or 16-bit modes. The primary method behind this section is Frequency Separation and to some degree High Pass. The benefit of this panel, though, is the amount of control you have over this method, and how easy it is to set-up: one click.

stylemypic-photoshop-panel-retouch-adobe-slrlounge-photography-11

I think one of the best parts of the panel has got to be the Color Dodge and Burn ability, which essentially allows you to sample, and lightly paint over areas, making skin tone matching and transitions of colors a breeze. Anyone who does this knows how taxing it can be, especially to retain skin texture.

Color Grade Pro

This is something special. If you’ve ever seen photographs by say, Annie Leibovitz, you’ll know how she often has a particular hue to her backgrounds and often (or most famously) that can be a sort of teal color. Well, this sets up your tone selection and then drops in your color grade (which is entirely customizable) to get that very look, or any you desire.

stylemypic-photoshop-panel-retouch-adobe-slrlounge-photography-15

Further on, there are options for black and white that again do all the set-ups for you, photo illustration that gives you HDR landscapes and a grunge look with single clicks. The tool kit is full of what you’ll need to finish off an image with sharpening, texture overlay, tone mapping, dodge and burn, and luminosity masks.

Also, if you have actions from sets you’ve bought or created, 3 of these can be brought into the panel itself for even easier and quicker access, which for me, is brilliant, as I have a specific set up for sharpening and a variant of frequency separation I have made actions for that gets a lot of use.

stylemypic-photoshop-panel-retouch-adobe-slrlounge-photography-14

How Is It In Practice?

It’s good. Actually, I’m a relatively advanced Photoshop user when it comes to retouching, and I think if you’re a beginner or intermediate, you’re going to think it better than good, if not brilliant. Once you keep in mind that it’s not going to do all the work for you, and as such, you decide how much of each effect to use and use discretion; this panel could severely up your retouching, and the more adept users will see an improvement of workflow

The Good

  • The logical layout of the steps I think is a good move and enforces proper methodology, and will be appreciated by most.
  • Installation is simple, and the panel seems free of glitches.
  • The results using this are not only very, very good, but can be achieved in record time.
  • The color dodge and burn and color grading set-up is probably the best and easiest I’ve seen in a script, and that alone is probably worth the price.
  • The different options for skin retouch either headshot, 3/4, or full length makes logical sense. It also means that if you’re a wedding shooter, you can click a button to cover most every type of image from a session, and that’s nice.

Room For Improvement

  • The skin texture feature button seems to give the same texture all the time
  • If your subject has moles, I noticed that should you be doing skin smoothing or color dodge & burn, the moles had a habit of becoming the color you are using in the center, and then leaving a ring as the remnant of the mole.
  • I personally would prefer that more accurate terminology be used such as ‘frequency separation,’ because to those that know it, we understand it well, and each step is an extension of self which means we don’t want to learn how this panel ‘does it.’ Also, as it’s a standard method now, I think it’ll do well for beginners to become acquainted with it and its steps.

Conclusion

If you’re a beginner or middling retoucher and want to reap some of the benefits of professional techniques within minutes of downloading the panel, then this could be what you’ve been looking for, because that’s exactly what you’ll be able to do. It will not only introduce you to these processes, but teach you best practice. There isn’t much in the way of instruction for use in the panel, and you may want that, but the layout helps, and you can see some of the other videos we’ve featured here from StyleMyPic where the panel is used to help mimic shots by famous photographers with basic gear, to get a sense of how powerful it really is.

patrick-Demarchelier-stylemypic-famous-photographer-beauty-fashion-photography-gear-slrlounge-4

stylemypic-photoshop-panel-retouch-adobe-slrlounge-photography

6-minute edit

For those in my camp, the more advanced and Pro, this is not going to likely bring any tool that you’re not already aware of how to do manually, so there will be no surprise, and actually the button labelling may be a bit annoying. That said, the results can’t be argued with; the speed at which you can do a retouch via this panel is truly something impressive. The retouch you see here was done in about 6 minutes, and for most purposes this level of quality (which is high) is going to be just what you’ll need. So I can safely recommend this to those looking to up their game, and those who want to play it faster.

See it in use below, and get it here for only $69.

If, by chance you’re not a Photoshop person and have all you need in Lightroom, or perhaps you want an accompanying set of tools to get you to master Lightroom, might I suggest the Lightroom Workshop Collection. There’s nothing better. There’s no substitute.


‘Truly, Madly, Cheeky’| Victoria’s Secret’s Blatant Photoshop Malfunction

$
0
0

victorias-secret-lily-aldrige-model-fashion-lingerie-photgraphy-panties-fail-slrlounge-3

They are by no stretch of the imagination, absolutely some of the most visually beautiful women on the planet, with body measurements so unreal and features so striking that pretty much make them goddamn unicorns. But in this day and age, even they, it seems, aren’t without wanting of a little dodge & burn and liquify. They are human after all, but it seems a retoucher and editor have decided they should look a bit less, well, you’ll see…

An image posted online on their Facebook page not long ago shows a VS model ass-backwards to the camera to show off their new ‘cheeky’ underwear. The lighting is pretty, their skin is flawless, the hair as lustrous as the mane on the dog from Neverending Story, but something was amiss. The left thigh and butt cheek of the model show clear signs of over-tampering in Photoshop, to the point that they blend into one another. There’s also signs of mishandling on the upper right arm, but it’s not quite the main attraction.

victorias-secret-lily-aldrige-model-fashion-lingerie-photgraphy-panties-fail-slrlounge

This isn’t the first time VS has been caught over-shopping their models, and I’ve met a few of the VS Angels in person on more than a few occasions, and most don’t look like the average mortal, even in the casual settings we were in. So it really begs the question:

victorias-secret-lily-aldrige-model-fashion-lingerie-photgraphy-panties-fail-slrlounge-2

Especially when we consider the traction that positive body image has been making, and that companies like Aerie, another underwear brand, has allegedly stopped airbrushing their models entirely, it seems strange.

[REWIND: ADOBE UNLEASHES HOST OF UPDATES AND RELEASES FOR MOBILE & DESKTOP]

Thoughts

I personally have no issue with models being photoshopped, as long as it’s not within a hair’s breath of a parody, nor do I have an issue with brands picking the most stunning women out there to represent their product. I don’t subscribe to the ‘let’s market the average person to the average person’ mantra at all. However, I hope images like this don’t serve to act as a precedent for other photographers. More than anything, it should be a cautionary tale to once again take care in your retouching and always err on the side of ‘less.’ Discretion is the better part of valor…and retouching.

Source: Business Insider

Down & Dirty Dodge And Burn Technique Using ‘Blend If’

$
0
0

how-to-use-blend-if

Blend If‘ is a highly undervalued tool in Photoshop. I use it on a daily basis for lots of different things and by the end of this article, you will too. I’m going to show the basics first, where to find it, how to use it, etc. Then we’ll move on to using it to apply some simple yet effective dodging and burning.

Where To Find ‘Blend If’ And How It Works

You can find Blend If by double clicking on any layer. When you do that the Layer Style dialog box will appear. On the very first screen (Blending Options), you’ll find the Blend If controls at the bottom. There are two gradients with pointers on either side. The top is labelled This Layer and the Underlying Layer.

best-way-to-dodge-and-burn

The tool is pretty simple, but the effect it can have certainly isn’t. If you’re doing this on the computer, open an image in Photoshop and add an empty layer above the image. Fill this layer with black. The names of the two sliders are self-explanatory. The top slider, This Layer, will take the highlight/shadow analysis from only that single layer. Whereas, the Underlying Layer slider will take its analysis of the highlights and blacks from every layer beneath the one we are working on. As such, the majority of the time we use the Underlying Layer slider.

For those of you on the computer, click on one of the black pointers and drag it out. You’ll notice the black begins to disappear. The key point to note here is that it starts to disappear from the darkest area first. What you’re doing by moving that slider is telling the layer you are working on not to appear where ever the underlying layer is darker. If you were to slide the white (or grey) arrow, you would see the opposite happening.

One thing you may have noticed is that the transition is quite abrupt. If you were to paint on a layer now, you’d see some ugliness. That’s why we never slide the pointers as one. Hold Alt, click on the pointer and drag. By doing so, you’ll see the pointer split in half, and the effect have a smoother transition.

[REWIND: HOW TO USE BLEND MODES TO TOTALLY REVAMP YOUR PHOTOGRAPHY | BRILLIANT WORK FROM JIMMY MCINTYRE]

dodge-and-burn-photographyDown & Dirty Dodge And Burn Method

Hopefully, you now know that by moving these sliders you can tell the layer you’re working on to only be visible where the underlying layers are either brighter or darker. Now how do we use this? In the following image, I used this technique extensively. Effective dodging and burning is a laborious and skilled task. You need a really good understanding of light and the way it interacts with your scene to be able to realistically manipulate it. This is especially noticeable on a person’s face, for instance.

By using Blend If we can make this whole process a little easier. If you want to totally change the existing highlights and shadows in your image, then this technique will not work. Instead, what we will be doing is using Blend If to limit and control our brush work. Thus allowing us to a) extenuate the already existing highlights and shadows and b) be a little clumsy with our masks. Check out the before and after of this image I recently edited.

how-to-use-blend-if

Pay special attention to the Stag, the trees and the mud pile the stag is standing on.

how-to-use-blend-if

By using the Blend If technique I just explained, I was able to quickly carve out the highlights and shadows in the areas I just mentioned. I even used it to exaggerate the fog surrounding the stag a little. Take a look at the next photo that shows all the different dodge and burn layers I used. Note the symbol next to many of the layers. That symbol indicates that a layer style has been added (almost always that was Blend If).

dodge-and-burn-using-blend-if

[REWIND: MAGNUM PHOTOS DARKROOM MAGIC | THE GENESIS OF PHOTOSHOP & LIGHTROOM]

If you are wondering how I dodge and burn in the first place, I opt for the curves method (there are lots to choose from). Create two curves layers, drag the curve up on one and down on the other, fill both layer masks with black and paint on those layers masks with a white brush. Simple. If you want to be a little more technical, I sometimes change the blend mode of those layers to Luminosity so as not to affect the colour of my image while dodging and burning.

What Else Could I Use This For?

In the most basic of terms, using Blend If is similar to using the brush tool in Lightroom to affect either the highlights, whites, shadows or blacks. The difference being that, in Photoshop, we can use layers, and apply this effect to more than just a dodging and burning layer.

blend-if-for-dodging-and-burning

I was recently editing this product shot for instance and needed to darken down the labels. Rather than make some complex selection, I just created a quick Burn layer and roughly painted over the labels. I then used Blend If to limit my selection to the labels and remove it from the white bottles.

[REWIND: 5 LAYER MASK TIPS YOU MAY NOT KNOW]

There are so many possibilities for this technique, and I encourage you to mess around in Photoshop and see what you get. Good luck!

Use Your Photoshop Skills to Save Lives In the 2015 #PSMystery

$
0
0

Last year, Adobe created an interactive murder mystery-styled game to celebrate Halloween and to test your Photoshop (and sleuthing) skills. They released clues in the form of PSD files on their Facebook page to help Adobe users solve the whodunnit mystery.

PsMysteryLaunchPost-1024x576

This year’s #PSMystery game takes place in space in the year 2398. The backstory is that the pilot of IXS FarStar, which is currently in space and scheduled to re-enter the Earth’s atmosphere on October 31st, has contracted a mysterious illness. Your mission, should you choose to accept it is “to diagnose the ailment and cure the patient” by collecting the clues and then post a screenshot of your findings to the Photoshop Facebook page so you can “return the IXS FarStar and its crew safely to Earth.”

The first clue, released yesterday is an 158 megabyte, multi-layered PSD file, which you can download via the Adobe Photoshop Facebook page here or a faster zip file here. You need to use your Photoshop skills to uncover the clues in the photo, like moving things around to see if anything is hidden. When you uncover an item or items, be sure to post on the Facebook page. See what others are posting as well to help you cure the illness!

[REWIND: OPEN AND COMBINE IMAGES INTO LAYERS IN PHOTOSHOP]

PSMYstery-game-2015

All the clues can be found in this Facebook Album titled, #PsMystery Halloween 2015. The page says to report back today at “17:00 Zulu…to get further access and files needed to solve this year’s#PsMystery.” Good luck and happy sleuthing!

[Via Adobe Blog]

Upcoming Rangefinder Mirrorless? Astro Exposure Stacking Tutorial! {Daily Roundup}

$
0
0

Welcome to our roundup series where we will hit on several gear news and rumor topics each day. This gives you a chance to get caught up on all of the day’s news and rumors in one place. Make sure to check back daily for the latest gear news, rumors, and announcements.

Three Upcoming Rangefinder-Style Cameras

x-pro1-kit-deal

In the smaller form factor market, there is a pretty clear bias towards rangefinder or similar style cameras, and if this rumor from Mirrorless rumors is correct, more are on the way.

According to the report, Sony, Fuji and Olympus all have rangefinder-style mirrorless cameras coming down the hatch within the next six months or so. The first camera to expect (though I am not so sure), is the Sony A6100. This camera is expected to be announced in the next 2-4 weeks, but given that this is the third time now that I have seen rumored release dates for this camera…I’ll believe it when I see it.

Next on the list, according to rumored release, is the Fuji X-Pro 2. Yes, the original mirrorless rangefinder knockoff (Leica aside, of course) is getting an upgrade. According to the latest reports, not only is the X-Pro 2 getting some nice design and spec upgrades, but this could also reveal Fuji’s next generation X-Trans sensor – something I have been waiting to see before jumping back into the Fuji system.

Third, according to the report, will be a newly designed Olympus PEN camera. This new take on the PEN line will feature a built-in EVF, rangefinder styling, and is expected to be announced in early Spring.

If you are a fan of the rangefinder style, it seems that you will soon have some pretty compelling options to add to your shopping list. Which model above are you most curious to see launched?

Best Sony A7 Series Mod Ever?

Bildschirmfoto-2015-10-12-um-22.43.45-700x370

The above image cropped up this morning of a really awesome A7R modification coming out of Asia. As you can clearly see, the A7R above has been modified and had the Sony logo on the EVF replaced with a Contax logo.

I would be too paranoid of causing damage to do this to my A7R II, but wowzers! That is one sexy camera modification. Oh, and in case you were wondering, that Contax lens on the front of the camera is the Hexanon 50/1.2, a sweet lens that will set you back $2-3,000.

Personally, I love the mod above, but I am curious what a you all think? This modification aside, would you ever consider modding your camera and ‘making it your own’ so to speak? Leave a comment below and let us know!

Milky Way Exposure Stacking with Lonely Speck

Ian Norman, from the Lonely Speck, is back with another awesome astro-landscape tutorial. This time, Ian tackles the issue of exposure stacking when the Photoshop auto-align feature fails to accurately stack your images.

It is a bit of a longer video, running just over 24 minutes, but if you are looking for a way to improve your astro-landscapes, it is well worth the time. I also highly suggest checking out his other videos, which we have featured in the past, if you are serious about jumping into astrophotography.

Exposure stacking is a great way to improve the image quality of your Milky Way imagery without having to upgrade to an expensive full frame rig. I mean heck, the camera he used in this image was an RX100 Mark III, hardly an ideal astro camera – but it proves the point that this is a technique that can be employed by anyone to take some amazing astro imagery.

What are you doing tonight?…

What are your thoughts on today’s roundup? What news/rumors did we miss? What would you like to see covered in future roundups? Leave a comment below and let us know what you think!

A Touch of Wonderland | Photoshop Breakdown & Tips for Photo Manipulation

$
0
0

Learning something new can be difficult, especially if it’s Photoshop. I remember spending HOURS trying to figure out how to edit an image, googling YouTube videos and searching for tutorials to try and figure it out. I now have a rudimentary knowledge of the basics of Photoshop – enough to get me by and do some damage.

You might remember the work of Tanya Musgrave. The self-described Photoshop hobbyist created Planet Hoth for her newlywed couple which we featured in this article, along with her 3 minute time-lapse of the 12-hours it took to create the photo manipulation. When I spoke with Tanya about featuring her video, she mentioned that she was just commissioned by a groom in Hong Kong who had seen Tanya’s Hoth PS breakdown and wanted to surprise his wife with a photo manipulation with an Alice and Wonderland theme. I immediately called dibs on the project, and Tanya sent me the final images and video that you see below.

This second photo manipulation, Tanya reports, took about 12-hours (the same as the previous Hoth manipulation), but she learned quite a bit through trial and error and did save time in selection.

tanya-musgrave-photo-manipulation-1 tanya-musgrave-photo-manipulation-2

Tanya would be the first to admit that she is still learning the craft of photo manipulation and she welcomes any “kind and constructive criticism” as well as advanced tips. I asked her to provide a few photo manipulation tips/mistakes to avoid for the Photoshop Newbs like myself, and she gave me a few:

1. Use layer masks/adjustments when doing anything destructive (i.e. color, levels, “erasing” especially). Or just copy the layer beforehand so you have a backup. I made the mistake of doing a blur on one of the mushrooms and later wanting it sharper. I’m still researching on how to blur on an adjustment layer—suggestions welcome.

2. Refine edge after using the Quick Selection tool works well for selecting complicated edges; tutorials on Phlearn were invaluable. I’m still finessing my use of it because I often ran into the problem of the smart edge creeping into the middle of the image, so I’d end up having to paint it back in with the brush. Also used the pen tool for limited edges like the pins on [the groom’s hat – above], but it wouldn’t have worked very well to select the yellow mushroom, for example. It was a great learning experience for sure, but sometimes the trusty brush gets it done better (for me anyway).

3. Blending is probably the most common question I get. There are probably at least 5 steps I do for each layer to make it seem like they’re actually in their environment.

  • Lighting – Making sure that the quality (soft or harsh) and the direction makes sense. For this particular one, I made the couple the focal point and chose to feature light emanating from the center. For some, it won’t sit well that the surroundings have a different light source than the couple, but that look seems to be quite common in high fashion, so I went with it. What wouldn’t have worked, though, is using a photo of the groom that had soft, subdued light.
  • Color – I use Color Balance and Hue/Saturation (for more individual channels of color) to match the color to the surroundings.
  • Edges – Sometimes the edges look way too stark against the background. For this, I might use refine edge, but using a brush at around 85% hardness helps to soften that.
  • Environment – Getting your layer to interact with the environment is important, whether that’s adding a shadow, or putting grass in front. What I did for their feet and the bases of the mushrooms was to actually paint on their layer mask with a grass-shaped brush.
  • Cohesive Atmosphere – As a whole, it matters that those layers blend with the rest of the piece, so usually I put a slight color tint over the whole shebang. On top of all your layers, fill a layer with a relevant color, set the blending mode to “Overlay” and turn the opacity down to say 50% depending on how stylized you want it. I also add some “mist” by painting a lighter color over bits of the entire piece, Gaussian blur it out at 100% and turn the opacity down to 30% or less.

Thanks for the tips, Tanya! You can see her Touch of Wonderland blog post here as well as see her work on her website.

Comment below if you have any advanced Photo Manipulation tips for Tanya Musgrave or me, the Photoshop newbie.

Learn 28 Photoshop Tips, Tricks, & Hacks in 21 Minutes

$
0
0

We cannot deny the power of Photoshop. It can turn mere mortals into supermodels, transport couples to Wonderland and even save lives with just a touch of your fingertips. But to wield the power, one must know how to use it, and the learning curve is a steep one. Not many can just launch Photoshop and “figure it out.” To be great at it, one must put in the hours and learn not only how the hundreds of little buttons, menus, levels and doo-dads work, but what they mean. It’s like learning a new language.

photoshop-tips-whiten-teeth-tutvid

There are thousands of tutorials out there to learn Photoshop, but who has time to sift through them and learn it all? In this age of instant everything, we all want the TL;DR version and the following video will provide some of that for Photoshop. In the 21 minute video below, Nathaniel Dodson of @TutVid shows us 28 tips and tricks of Photoshop CC 2015. Below are all of the 28 tricks you’ll learn and the time stamp:

0:38 – Whiten Teeth
1:23 – Merge all Layers to New Layer
1:50 – Rotate View Tool
2:49 – Change Layer Opacity Hotkey
3:57 – Choosing Layers Hotkey
4:11 – Move Layers Hotkey
4:35 – Change Units of Measure
5:07 – Add More Undo Steps
5:53 – Apply Pattern Along Path
6:55 – Create Filled Layer Mask
7:21 – Instantly Find Center of Document
7:48 – Quickly Change Color of Anything
8:35 – How to Paint a Selection
10:00 – Black & White w/ Channel Mixer
11:03 – Filling Text or Shape Layers
12:03 – Scale Layer Styles
12:57 – Precise Painting w/ Brush Tool
13:26 – Duplicate Anything
13:53 – Before/After Preview Hotkey
14:30 – Straighten a PSD Two Different Ways
15:08 – Bird’s Eye View
15:25 – Clipping Mask Power
16:28 – Instagram/VSCO Fade Effect
17:06 – Hacking Selection Creation
17:25 – The Fastest Retro Effect
17:55 – Extract Assets for the Web
19:07 – Multiple Layer Styles
20:13 – Photoshop UI Easter Egg

To see more from @TutVid, check them out on social media:

If you want to learn more about Photoshop, check out some of these previous articles as well as the Photoshop tutorials in the SLR Lounge store.

How to Create Photoshop Actions The Right Way So They Work Every Time

$
0
0

Photoshop actions are an indispensable part of my workflow. They are very similar to Lightroom presets, which you may be familiar with, but can be far more complex. You can record anything you do in Photoshop, no matter how many steps there are, and then use that action again and again on any image. Take a look at the image below and you’ll see just how many actions I have.

Create-Photoshop-Actions

Photoshop actions allow me to save time and to utilize the vast array of editing techniques I have picked up over the years. With a memory like a sieve, that is invaluable. I don’t want to go into detail about whether it’s good to use Actions or Presets, I’ve already written that article, but I do want to show you how you can make the perfect Photoshop actions. Yes, that’s right. There is a right and a wrong way to do it.

[REWIND: PHOTOGRAPHY ACTIONS AND PRESETS ARE THE DEVIL! OR ARE THEY? THE BENEFITS OF USING THEM IN YOUR WORKFLOW]

The-correct-way-to-create-photoshop-actions

Tip 1: Create Perfect Photoshop Actions – Do Not Click Within the Layers Panel

Do not click within the layers panel. If you select a layer by clicking in the layers panel, your action will record that you clicked on that layer. Photoshop will then search for that layer every time you run the action. When running the action for a second time, it will select the first instance of the layer and not work correctly. In the photo above, you can see where Photoshop has recorded me clicking on a layer. This is what we want to avoid. Whereas in the photo below, I have created the action the correct way.

photoshop-actions-not-working

The photos show an example action I’ve created for this tutorial. It’s a simple action which creates two curves layers, adjusts them, names them and places them in a group called “Dodge and Burn.” In the first photo, you can see that one step in the action is called “select layer Dodge.” If you were to play this action once it would work just fine. Play it more than once in one document and, on the second time, Photoshop searches for the layer “Dodge” and finds that it exists already. Thus it selects that old layer, rather than the new one just created, and ruins your action.

the-wrong-way-to-create-photoshop-actions

 Tip 2: Create Perfect Photoshop Actions – Use Shortkeys

Use shortkeys to avoid clicking on layers and to move between them. There are certain instances when you can click in the layers panel, but the safest thing to do is avoid it. Here are a few simple shortkeys for the layers panel that will allow you to do everything you’d normally do with the mouse.

Ctrl + [ or ] = moves entire layer up or down
Alt + [ or ] = changes which layer is selected
Alt + Shift + [ or ] = Select multiple layers

Head over to Photoshop, create a few layers, and give those a try. The last shortkey is what I use if I want to group multiple layers. These take some getting used to, but the beauty of actions is that they are completely editable. You can make a mistake, hit stop, and delete the last recorded step. I do that all the time!

[REWIND: 25 AWESOME PHOTOSHOP KEYBOARD SHORTCUTS THAT YOU MAY NOT KNOW]

record-photoshop-actions

Tip 3: Create Perfect Photoshop Actions – Use the Layer Menu

I am so lazy when I work in Photoshop. I don’t like naming things and would certainly not colour code my edits. By creating actions in the correct way, we have the opportunity to do all those things, and to only have to do them once. Ah, my lazy gene is happy!

The best way to create any new adjustment layer, blank layer, mask, group or anything else you would like to do to a layer, is by using the Layer menu. That prevents us from touching the layers panel and will present us with a very useful dialogue box.

Take the creation of a new Curves layer, as an example. We go to the Layers menu > New Adjustment Layer > Curves. Up pops this dialogue box that will allow us to name the layer, color code it, change the blend mode, and the opacity. Because you’ve created the layer like this, Photoshop can create it over and over again without ever interfering with anything else.

Photoshop-Actions-The-Right-Way

Tip 4: Create Perfect Photoshop Actions – Add Stops to Give Yourself Instructions

Add stops to give yourself instructions. If you’ve just discovered a difficult technique that you love, you may need a couple extra pieces of info to ensure that you do it correctly. Simple, insert a stop. You can do so by clicking on the down arrow at the top of the Actions panel. Once created, you’ll see the stop appear as a step in your action. You can also edit that text by clicking on the step in the Actions panel. See the photo below for an example of a stop.

[REWIND: IMPROVE YOUR PHOTOGRAPHY WITH THESE 3 ESSENTIAL PRACTICES]

recording-photoshop-actions

*Bonus Tip*

When creating or editing actions, think non-linearly. The program records a step; that’s all. You can break down any process in Photoshop into steps. Even if those steps were recorded at different moments, they can be rearranged (by dragging the relevant step) and put in the right order or replaced. For example, I recently changed the blend mode I use for Dodge and Burn to Luminosity. Rather than re-record my actions, I hit record while working and changed any old layer to luminosity. Photoshop records:

“Set current Layer
To: Layer
Mode: Luminosity”

I then dragged that step to the correct position in each action.

Summary

If you follow the steps I’ve given here, you’ll have perfect, repeatable actions that won’t interfere with any existing layers. Remember, avoid clicking in the Layers panel, use shortkeys as much as possible, and use the Layers menu to create the actual layers/ adjustments.

My workflow differs depending on what I’m editing, but, in general, it goes like this: I use the SLR Lounge Preset System in Lightroom and then move over to Photoshop to add any final touches necessary using my own actions. I love the SLR Lounge Preset System and definitely advise you to check it out if you haven’t already. You can find it here. Having built your own set of Photoshop actions you can bring that seamless Lightroom functionality, which the Preset System provides, into Photoshop.


Retouching In Photoshop | Correcting Skin With Hue & Saturation

$
0
0

There are so many different ways to edit skin in Photoshop. Some techniques produce lovely, natural results and others, a gag worthy, plastic mess. Frequency separation is by far my favorite method to correct skin, but it is also very time consuming. As a result, we need to have a few methods for retouching skin that are a little quicker.

A Hue and Saturation layer is an excellent way to quickly adjust the color of skin. It’s not as versatile as Frequency Separation but it’s much quicker and far easier to get your head around. I use it all the time for making subtle adjustments to a person’s face and even use this method to make more global refinements.

retouching-in-photoshop-to-adjust-skin-colour

This photo is already pretty good. However, as you can see below, there are a couple areas that I would like to adjust. There’s some patchy redness between the eyebrows as well as on the left cheek. And there’s also a bit of discoloration under the eyes. My personal preference when it comes to editing is not to make things 100% perfect; although it does depend on what I’m editing. In general, with portraits, I like to enhance rather than perfect. There’s been a bit of a shift in recent years, away from overly Photoshopped images and toward something a little more natural. That’s where I like to reside.

corecting-skin-retouching-in-photoshop-using-hue-and-saturation

Retouching In Photoshop: How To Use Hue & Saturation to Correct Skin

Having identified our problem areas, we can use Hue and Saturation to isolate the colors and adjust them accordingly. Our 1st step is to create a new Hue and Saturation layer. With that done, we need to select the correct colour channel.

[REWIND: A TOUCH OF WONDERLAND | PHOTOSHOP BREAKDOWN & TIPS FOR PHOTO MANIPULATION]

We could guess the color channel we want and just select it from the drop-down menu at the top (where it says “master”), or we could use the “Targeted Adjustment Tool,” aka the hand with the arrows (see photo below). With that tool selected, click on the area you would like to adjust. In this case, I chose the area beneath my subject’s left eye. Photoshop automatically selected the red channel.

adjusting-skin-colour-retouching-in-photoshop

We could stop here and begin adjusting, but if we did, we would be making fairly broad adjustments to the red channel, and that’s not what we want to do. To further refine the selection, we’re going to use the Color Range slider at the bottom of this panel; it’s circled in the photo above. The Color Range slider will allow us to target a far more precise range of colors, thus enabling us to make defined adjustments to skin imperfections.

Within the Color Range Slider, there are three adjustments we can make. The first two control how wide our selection is (how many colors/shades we are affecting) and the speed at which that selection falls off. The other moves that selection throughout the entire colour range of our image.

If you look at the slider, you will see two white lines and two circles either side. The closer the lines are together, the fewer colors/shades you will be affecting. The circles represent the fall off of that selection. It’s sort of like feathering. If those circles are very close to the lines, then your selection will abruptly stop. Whereas, move the circles further away and it gradually fades away.

QUICK TIP – When making your selection, drag the saturation slider up to 100. By doing so, it makes it very easy to see what part of your image you are affecting, see below.

retouching-in-photoshop

Retouching In Photoshop: Adjusting The Color

We’ve now selected a very narrow range of colours that we can adjust. All you have to do is move the hue slider until you start to see the desired result. Once you do, add a mask to your layer and fill this mask with black. Remember, we want this to be very targeted, and hence we don’t want our adjustment affecting any other part of our image. Use a white brush on the layer mask and paint the adjustment where needed. As this is such a targeted technique, I often use a few of these layers to adjust different parts of the face.

Here is the final photo with the skin having been corrected. If I were making this “perfect,” there are still many things I would adjust. For the purpose of this image, however, it is “perfect.”

natural-editing-retouching-in-photoshop-with-hue-and-saturation

You could use this technique to take away blotchy redness, that magenta tint people often get around their eyes, or even alter the color in a more global way. For example, if you wanted to take away a large amount of redness from a person’s face, I strongly advise caution. When making larger adjustments, even minor changes to Hue can have a very big impact.

[REWIND: DOWN & DIRTY DODGE AND BURN TECHNIQUE USING ‘BLEND IF’]

These next two photos are a good example of a more global approach to this technique. I wanted to reduce the red hue from around the cheeks, nose and mouth. Given that this was all within the same color range I was able to do so with one adjustment layer. However, as it was a global adjustment, I was more cautious with settings.

BEFORE:

retouching-in-photoshop-with-hue-and-saturation

AFTER:

retouching-in-photoshop-with-hue-and-saturation

Retouching In Photoshop: Hue & Saturation Summary

There are so many different ways to edit skin in Photoshop. Some take hours and some take minutes, but very few are wrong; if used correctly. As I often say about gear, it’s the right tool for the right job. Spending 2 hours editing each photo from a family photo shoot is just daft, whereas, that may be more common in high fashion. For beauty, you might be spending far longer to achieve that “perfect” look.

The key to Lightroom and Photoshop, in fact, just editing, in general, is to absorb as much info as you can. Equip yourself with an array of techniques that can be utilized at the right moment. It’s usually either time or budget constraints which will determine what is best for you to use.

For some fantastic time-saving presets for Lightroom, be sure to check out the SLR Lounge Preset System. The system that the team have created is an excellent time-saving tool which I’m able to use on 90% of jobs. You can find it here.

How to Batch Resize Images in Photoshop in Seconds

$
0
0

Welcome to Time Out with Tanya, where I’ve put my fast paced graphic design career on hold in favor of adventures in motherhood. I’m capturing every moment on camera, and you can come along if you’d like. Sign up for my weekly email here so you’ll never miss a Time Out.

After I created my How to Resize Images in Photoshop Five Different Ways video, I realized I forgot to include a sixth very important tip. Batch resizing! What if you want to resize a whole folder of images in Photoshop and they all need to be the same size? You can do that in a matter of seconds with batch processing. I use this when I’ve been sent a folder of images to feature on SLR Lounge, or I want to resize a folder full of images for a website or blog post without taking the time to import them into my Lightroom catalog or search for the original files in my database. Here’s a quick video showing you how to do it plus a step-by-step written guide below.

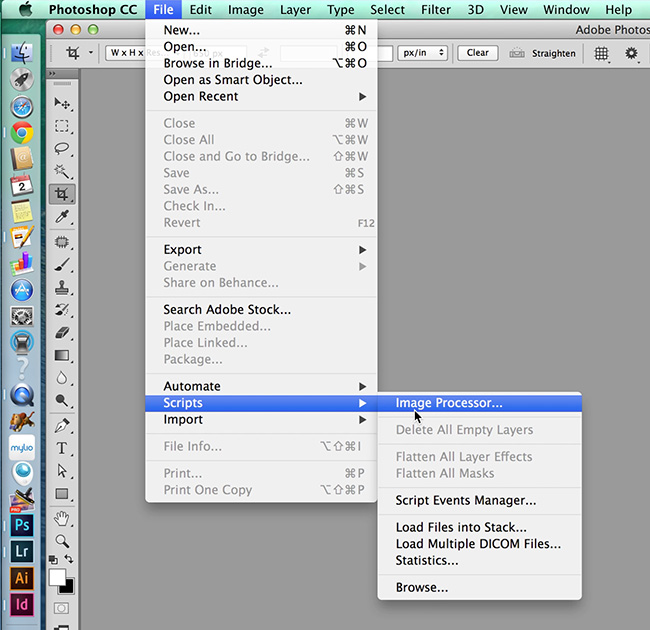
Step #1: Click on File > Scripts > Image Processor

how-to-batch-resize-images-photoshop-Image-Processor

Open Photoshop and click on File > Scripts > Image Processor. The Image Processor dialog box will show up on your screen. This is your new ticket to time-saving freedom.

Step #2: Choose Your Folders

how-to-batch-resize-images-photoshop
Next, choose the folder that contains the images you want to resize. All the images in this folder need to be the same aspect ratio in order to avoid distorting your images when they’re resized. After you choose your image folder, you need to choose or create a destination folder. This is where your newly resized images will be saved.

Step #3: Enter Your Dimensions how-to-batch-resize-images-photoshop
Now you’ll enter the dimensions for your resized images. In order to resize and save as a jpg with this method, you must enter the height and width. If you’re bad at math (like me), you can just open one image in Photoshop and resize it in the Image Size dialog box with the chain icon clicked. When you enter one dimension, it will calculate the dimension of the other side for you. Find out more about the Image Size dialog in my article How to Resize Images in Photoshop Five Different Ways.

Step #4: Run the Process

how-to-batch-resize-images-photoshop
Finally, click “run” and watch as Photoshop automatically resizes your entire folder of images in seconds. You won’t even have time to check your Facebook status (depending on how many images are in the folder, of course, but it usually runs pretty quickly).

Step #5: Double Check

Lastly, I always double check to a) make sure the images got saved in the place I thought I saved them and b) make sure they actually processed to the correct size. To check the size, I just open up one image from the folder in Photoshop and double check the size using the Image Size dialog box. Yep, this one worked! Now, you’re all set to resize an entire folder of images in seconds without creating a custom action or anything.

BONUS! Image Processing + Actions

how-to-batch-apply-action-images-photoshop
You can use Image Processing to apply an existing or custom action to an entire folder of images, too. At the bottom of the Image Processing dialog box, under the Preferences heading, click on “Run Action.” Then you can select any action you’ve created or imported into Photoshop, and it will be applied to every image in your selected folder within seconds. In the above example, I’ve selected the Frequency Separation Action for Newborn Photography, which is included in our Newborn Photography Workshop. This could save you a lot of time, depending on your workflow.

Now that you’ve saved yourself all that time, you can start wasting it by sharing this article on Facebook or Twitter or something. Thanks for taking a Time Out with me. Until next time. XO -Tanya

Liquify Is Broken In The Latest Photoshop Update & Here’s A ‘Fix’

$
0
0

liquify-photoshop-error-broken-fix-8bit-gpu-adobe-cc-photography-slrlounge-kishore-sawh-7

If autocorrect were to ‘work’ on speech, it would’ve said my first reaction to what the new Photoshop CC’s Liquify does to photos was ‘What the duck?’ Because in case you weren’t aware, with the new update came a new and exciting way to frustrate you, due to the fact that using the liquify tool to adjust an image would result in a rather large, not inconspicuous block around the area worked on as seen above.

I’d heard about the problem about a week ago, but I had friends visiting and was on hiatus from editing, and in any case assumed it was not a common experience. However, now in the throes of reviewing a rather good Photoshop panel, I’ve found this issue a blemish on an otherwise good day. To be clear, the issue in my experience has arisen irrespective of the specific action tool within the Liquify toolbox, whether it be pucker, bloat, reconstruct, or forward warp, but there is a workaround. Actually, there are two.

Thankfully, now that some time has passed since the issue initially arose, the boffins at Adobe have fiddled with the Rubik’s cube of a problem, and offered up the following:

  • The issue seems to only pertain to 16-bit files, so if you’re shooting 8-bit you shouldn’t notice a difference, and, therefore, you can get around this issue by simply converting the file to 8-bit prior to using Liquify. Now, of course, asking some to edit in 8-bit is tantamount to asking them walk through Tehran in a Star Of David T-shirt, and I’m in that camp, so that’s not really an option. If you’re with me then here are the other options:
  • Open your image as normal:
    liquify-photoshop-error-broken-fix-8bit-gpu-adobe-cc-photography-slrlounge-kishore-sawh-8Go into Liquify as normal, make your edits, and select ‘Save Mesh’ before exiting Liquify. It’ll ask you where to save and typically just let it save in the location of the image being worked on. There’s no need to keep the file name in mind either, and you’ll see why.
liquify-photoshop-error-broken-fix-8bit-gpu-adobe-cc-photography-slrlounge-kishore-sawh-6

Me, with a beer belly.

liquify-photoshop-error-broken-fix-8bit-gpu-adobe-cc-photography-slrlounge-kishore-sawh
liquify-photoshop-error-broken-fix-8bit-gpu-adobe-cc-photography-slrlounge-kishore-sawh-5

  • Now that you’ve done that, you can click ‘Cancel’ in the main Liquify dialogue box, and then holding down Option/Alt select the Liquify tool from the Filter menu again. What this does is disable the GPU in Liquify (more on that in a moment). Once in it, simply click on ‘Load Last Mesh’ and you’ll see the adjustments you made last, reappear. Now, click ‘OK’, and Bob’s your uncle.

liquify-photoshop-error-broken-fix-8bit-gpu-adobe-cc-photography-slrlounge-kishore-sawh-3

I don’t work on Windows computers, so this is second-hand information, but I’ve heard that option two above doesn’t really work for Windows users, something to do with disabling the menu or some other nonsense. So, Windows users, it would appear that your options are either to convert to 8-bit for edit, or simply go in and fully disable the GPU before working in liquify, and then coming to your senses and switching to OSX (I’m kidding).

[REWIND: 10-BIT SUPPORT NOW AVAILABLE FOR PHOTOSHOP CC IN OS X]

Thoughts

I’ve often advocated Adobe’s move to Creative Cloud and I still will. I like the fact it opens up availability to many more people due to the pricing structure, and that it allows for updates to be pushed out quickly. That said, there’s just been a slew of poorly executed updates, and that is a scar on the whole thing. I may be out of place here trying to speak for the majority, but forgive me for believing that most users would rather there be more flawless updates at the cost of having fewer of them.

Thankfully, this issue can be sorted in some way, but frankly, it’s a pest if you’re spending any decent time retouching. I’m a bit surprised that this rather glaring error could be overlooked by the Adobe Photoshop team. Come on Adobe, you’re letting the side down.

You can see a thread of angry users and their comments here

Photoshop Now Offers 4 Variants Of Healing Brush | Here’s What They Are & How To Get Them

$
0
0

photoshop-healing-brush-spot-healing-retouching-skin-cc-creative-cloud-photography-slrlounge-kishore-sawh-3

Are you one to stand in the way of progress? I think not. It may be our most ‘human’ quality, the need to relentlessly move forward. Actually, maybe it’s not human, but rather an evolution. Either way, in its pursuit of advancement, Adobe seems to be trying to push out new things all the time, even when they may not be ready. I don’t know if I can actually fault them for this considering any mover and shaker tends to preach that the most important thing for positive change is just to start. I believe I recall Sir Richard Branson saying, and I’m paraphrasing here, that the key differentiator between those who succeed and those who don’t, is that those who do begin before they’re entirely ready.

Anyway, what this means for Adobe is that they’re racing new tech before the tech can walk, and that’s made picking at them easy since it’s all low hanging fruit. We’ve seen it with Lightroom mostly, but aside from the noise of discontent with Lightroom, there have been some Photoshop issues also with their latest releases. You can see the mess they’ve made of the Liquify tool in this post from just days ago, and now there’s something else.

adobe-photoshop-cc-update-fuse-photography-slrlounge-kishore-sawh-6

There’s a ‘Healing Brush’ issue. Well, there has been an issue since an earlier update to Photoshop, which saw the healing brush engine changed to work quite differently than we’d been used to. It’s been dubbed as a ‘live’ healing brush that began to ‘heal’ as you began painting over the area to be healed. Prior to this in older versions, the change wouldn’t appear until you’d finished with your selection, but that’s not the case anymore.

Oh it sounds good, and I’m not entirely sure that it isn’t given the immediacy of the feedback to be honest, but it took a bit of getting used to, because as it wasn’t waiting for the selection to be made in full, it wasn’t essentially correcting the area based on all the selection, so it initially would look a bit off, and then more complete once the selection was done. You sort of just had to trust that it would look ok at the end.

photoshop-healing-brush-spot-healing-retouching-skin-cc-creative-cloud-photography-slrlounge-kishore-sawh-2

Of course, there were many that didn’t care much for the change, some claiming it slowed down their workflow (likely due to a less powerful system), and others just didn’t like the results. Personally, I hadn’t been bothered by it too much, but in an effort to please the masses, Adobe has released some options for everyone, effectively giving us access to 4 variants of the healing brush. Here they are:

Healing Brush As Per Photoshop update 2015.1
If you’ve done the update, this is what you got ‘outta the box.’ It is a healing brush that does have the ‘live’ view healing, but can be tempered with a ‘Diffusion’ slider marked from powers of 1 to 7. Essentially, what this means is you get to control the level of healing of the area. To be honest, I haven’t used this very much yet to comment, but I am so used to the old ways I’ll probably stick with it.

LegacyHealingBrush161 1:
Photoshop CC 2014 and earlier healing brush algorithm (i.e. Legacy), non-realtime user interface feedback.

This is supposed to be a throwback to those who want the healing brush to function as they’ve been used to in past generations of Photoshop, without the new engine, and without real-time feedback.

LegacyHealingBrush161 0:
Photoshop CC 2015 real-time algorithm with real-time user interface feedback.

This is the brush that came standard with Photoshop CC 2015 prior to the latest ‘.1’ update. It’s the one I spoke of in the intro to this piece, where you’ve got live view of healing where it doesn’t wait for you to make your entire selection, and it does not have a diffusion option.

LegacyHealingBrush161 2:
Photoshop CC 2015 real-time algorithm with no real-time user interface feedback.

Alright, this is arguably the most interesting option and the one I currently have set. It effectively is using the same engine, which should assist with speed theoretically, but does operate more like healing brushes of yore, where you make your selection, and then it goes to work.

The argument against it, however, is that it seems to actually just delay what it shows you ‘live’ and is actually doing the ‘healing’ live anyway, so the results may be the same as they have been in my experience. As I’ve said, I’m not much bothered and I haven’t seen much of a difference on the few files I’ve worked on for it, though some higher end retouchers have given word that it’s not quite as good.

[REWIND: LIQUIFY IS BROKEN IN THE LATEST PHOTOSHOP UPDATE & HERE’S A ‘FIX’]

Anyway, there you have it. If you want to switch from the default brush to any of these, here are the instructions as per Adobe’s site:

Follow these steps:

  1. Install the Photoshop CC 2015.1 update.
  2. Use Notepad (Windows) or TextEdit (Mac OS) to create a plain text file.
  3. Type the text:
    LegacyHealingBrush161 1 into the text file for Photoshop CC 2014 and earlier healing brush algorithm (i.e. Legacy), non-realtime user interface feedback
    LegacyHealingBrush161 0 into the text file for Photoshop CC 2015 real-time algorithm with real-time user interface feedback
    LegacyHealingBrush161 2 into the text file for Photoshop CC 2015 real-time algorithm with no real-time user interface feedback
  4. Save the file as PSUserConfig.txt to your Photoshop settings folder:
    Windows: [Installation Drive]:\Users\[User Name]\AppData\Roaming\Adobe\Adobe Photoshop CC 2015\Adobe Photoshop CC 2015 Settings\
    Mac OS: //Users/[User Name]/Library/Preferences/Adobe Photoshop CC 2015 Settings/
  5. Restart Photoshop. The changes will take effect.

Another Photoshop Update | Liquify Fix & More

$
0
0

photoshop-adobe-update-liquify-cc-cloud-slrlounge-kishore-sawh-2

It feels like only yesterday I was updating Photoshop Creative Cloud, but then, of course, it would, wouldn’t it, because I was. But the sense of familiarity I was feeling wasn’t because of that, but because it seems like that little notification to update in CC is there every fortnight. It’s like a constant feeling of deja vu.

In theory, and I guess fair to say mostly in practice, these updates are welcomed and bring good news, but recently accompanied by some troubles. There was the Lightroom import dialogue change and then that was reversed in another update, and then recently the Liquify problem in Photoshop, which was very much a surprise because it seemed like such a major issue with such an iconic and oft-used tool – how did they miss it?

photoshop-adobe-update-liquify-cc-cloud-slrlounge-kishore-sawh

Sure, there were/are workarounds for it, but that required either switching off the GPU during the Liquify process, or converting 16-bit files to 8-bit, and asking a retoucher to do that is like asking them to switch religions. The good news is, Adobe has released yet another update and the Liquify problem has been rectified. In addition, there were a number of other fixes too, many of which it’s more understandable they weren’t caught as they deal with more obscure elements of the program.

Updates & Fixes

  • Liquify lightens result on 16 bit/channel images
  • Freeze/crash using Liquify in CPU mode
  • Drag and drop from AI to PS no longer create Smart Object (Mac only)
  • Using control/command to switch to Move tool invokes auto-select
  • Align to selection doesn’t work with Artboards
  • Running Photoshop on 5K monitor at 200% results in black bar across the top of the app
  • Double clicking to open a document results in workspace set to Start instead of Essentials
  • Fixed top crashing issues submitted via crash reporter

[REWIND: SONY A7II | PROOF SIZE ISN’T EVERYTHING & IT’S HOW YOU USE IT]

So there you have it. I really welcomed this with open arms, and again kudos to Adobe for ushering a fix so soon. Asking for forgiveness really is easier than asking for permission, it would appear. See the full Adobe blog post here.

Viewing all 349 articles
Browse latest View live