Quantcast
Channel: Photoshop – SLR Lounge
Viewing all 349 articles
Browse latest View live

How To Use The Amazing Patch Tool In Photoshop | Aaron Nace

$
0
0

photoshop-phlearn-patch-tool-retouch-skin-adobe-srlounge-photography-2

The Patch Tool in Photoshop is one of the most versatile, and widely applicable tools in the Photoshop arsenal. It is so easy to implement in almost any type of photography retouching. Speaking from a personal perspective, it is probably the tool I use most aside from the all-encompassing Brush Tool. The ease and speed at which image subjects and backgrounds can be cleaned up using the Patch Tool is beyond anything I can think of in another application.

In this short Phlearn video, Aaron Nace takes the time to explain most of what there is to using the Patch Tool, where its limitations lay, and how to adjust its settings for the right type of environment and results.

photoshop-phlearn-patch-tool-retouch-skin-adobe-srlounge-photography-1

What the Patch Tool essentially does is allow a particular, free form selection of an image, to be taken and dragged into another location in the image. That selection is then sort of blended in with the surroundings, edges softened and all, to give a very close texture match to the surroundings. The applications for this are rather obvious, as it lets you add or remove or duplicate portions of the image with speed, and even do it between photos.

[REWIND: A Career's Worth Of Wisdom On Retouch, In A Minute | Russell James]

Thoughts

I photograph people and aviation primarily. Within these two fields, the patch tool is irreplaceable. For aviation, I often use it to clean up skies, airfields, and even tone/texture match parts of the aircraft, which for example, may be blown out highlights or oil stains on the body.

For portraits etc, the Patch Tool comes in handy almost everywhere. I use it to clean up uneven or blemished backgrounds, and of course, on skin. In fact, it’s no secret that using frequency separation is a primary method I use to retouch skin, and I actually use the patch tool within the ‘High’ and ‘Low’ layers to help even out tone and texture.


The Power Of Using Blending Modes In Photoshop | Aaron Nace

$
0
0

photoshop--modes-tutorial-album-cover-composite-skull-halloween-phlearn-slrlounge-photography-2

Blending modes have to be some of the least understood, yet commonly mentioned features in Photoshop. They do, however, have the ability to change an image to great effect with a single click, and then even further with just a few more manipulations. There are though, quite a few of them, and actually seeing them implemented in practice is about the best way to get a feeling for the power of each.

The same can be said for Photoshop on a whole. Learning Photoshop is somewhat tantamount to learning a new language, and likewise, immersion is about the best way to learn it, in my somewhat-humble opinion. This is where Aaron Nace and Phlearn really shine. Rather than reciting verbiage or conjugations, going through this tutorial on the power of using blending modes, like most of Aaron’s videos, is more like having a conversation with a native. It may not be the most technical, but significantly more usable.

photoshop--modes-tutorial-album-cover-composite-skull-halloween-phlearn-slrlounge-photography-1

On the surface, this is one of Phlearn’s Halloween specials, but it’s actually a great way to see blending modes in action, what can be done with them, and also how to manage them in your image workflow. You’ll learn what some of them do to an image in a practical sense, and then understand how they can be used to render the style of final product you want.

[REWIND: How To Use The Amazing Patch Tool In Photoshop | Aaron Nace]

Taking 2 primary images, and then 2 stock images is all that was required to come up with the final result, and the speed at which it was arrived at is really due to proper understanding of what can be done with blending modes. In this particular case, the Screen Blending Mode is the choice. Aaron also goes through how to use the liquify tool within a composite, using linear gradients, and global coloring using a gradient layer map – the latter allows for the choosing of a color for the dark and light points, and then the entire image is based off that scale, giving this shot its eerie hue.

photoshop--modes-tutorial-album-cover-composite-skull-halloween-phlearn-slrlounge-photography-1-2

There are a lot more tips to pick up from this tutorial, and I recommend watching it twice pausing often, and paying attention to the in-between actions which may not be the focal points, as these are little gold nuggets that Aaron peppers throughout.

As always, if you are a fan of Aaron’s teachings (and who isn’t?), be sure to check back here for updates, and follow along with Aaron on YouTube and Phlearn. You should also consider becoming quickly adept at Photoshop with the Phlearn Photoshop 101 & 201 sets as they are extremely comprehensive, and will have you quickly doing things with Photoshop you may have otherwise thought too complex, or didn’t even know you could do.

How To Create Snow In Photoshop | Aaron Nace

$
0
0

photoshop-phlearn-tutorial-aaron-nace-snow-winter-christmas-seasons-brushes-photography-slrlounge-2

Summer was dead to begin with. If you’ve been clinging on to the last vapors of summer, it may be time to admit that about now, unless you’re sitting with me in Miami, that you’re been reaching for a Marley-esque apparition. Summer’s gone and that’s not necessarily a bad thing.

Having just left Toronto and catching the best weekends for autumn colors, I can attest to the rejuvenated creative photography ideas that come from a change of seasons. Winter is around the corner and festive photography projects are something to look forward to. Keeping with the change of seasons, you may be preparing your Christmas card photos, or just want to add some wintery flair to images you already have, and might I suggest considering adding snow…in Photoshop. How? Allow Aaron Nace to be your guide.

photoshop-phlearn-tutorial-aaron-nace-snow-winter-christmas-seasons-brushes-photography-slrlounge-4

In this Phlearn episode, Aaron will teach you how to create snow, complete with movement and depth, from scratch. What it is, in essence, is a broad spanning tutorial on custom brush creation and layering. It may come as a surprise just how far reaching the abilities of custom brushes are, and how well they can allow any user to emulate real objects and movement, and it doesn’t have to be difficult.

From creating a rather bland initial brush, to adding scatter, jitter, and altering the shape and size of the flakes (all editable after the fact), this tutorial is quite comprehensive, and may take some pausing here and there to grasp all that’s being done. That said, a lot can be learned here from the in-between navigation steps. If you don’t feel like going through the trouble of the beginning steps, you can actually click this link, which will take you to a page where you can download the Phlearn Snow Brush.

[REWIND: The Power Of Using Blending Modes In Photoshop | Aaron Nace]

photoshop-phlearn-tutorial-aaron-nace-snow-winter-christmas-seasons-brushes-photography-slrlounge-1 photoshop-phlearn-tutorial-aaron-nace-snow-winter-christmas-seasons-brushes-photography-slrlounge-2

As always, if you are a fan of Aaron’s teachings (and who isn’t?), be sure to check back here for updates, and follow along with Aaron on YouTube and Phlearn. You should also consider becoming quickly adept at Photoshop with the Phlearn Photoshop 101 & 201 sets as they are extremely comprehensive, and will have you quickly doing things with Photoshop you may have otherwise thought too complex, or didn’t even know you could do.

Photoshop Tips: Whiten the Eyes Quickly and Naturally

$
0
0

The sclera is the part of your eye that is white and surrounds your eyeball. Whenever I am under a deadline or spend more than one day in Vegas, that white part of my eye turns a lovely shade of bright red. Those are the times I rely on my eye drops, which bleaches the sclera until they look almost too white. (And though that is a bit scary to me, I’m also more vain than scared, so eye drops it is).

Sometimes, your clients or models will have eyes that aren’t quite as white as you’d like whether from tired eyes or a reflection from something nearby. Instead of forcing Visine on them, here is a quick technique to whiten those scleras in Photoshop. In the 7.5 minute video below, Michael Woloszynowicz of Vibrant Shot shows us how to make the eye look more pleasing and natural. He says that typically photographers use hue saturation adjustment which renders a desaturated look, which is unnatural. Wolosynowicz’s method allows you to keep some of the little veins and spots, retaining a more realistic look.

[REWIND: COMPLETE PORTRAIT RETOUCHING WITH ONLY CAPTURE ONE PRO 8]

whiten-eyes-photoshop


In his image, the white of the model’s eye is picking up the dramatic blue makeup, which causes a slight discoloration. Wolosynowicz treats the sclera like a color cast and then offsets it. He uses the Select Color adjustment and the info panel to see the distribution of colors and then makes the changes accordingly. Watch the video below to see how he does it.

While this video is a Photoshop tutorial, Wolosynowicz has also released the same tutorial if you are using Phase One or Capture One Pro. You can check that out here.

To see more of Michael Wolosynowicz’s work, check out his website and for more tutorials, check out his YouTube.

[Via iso1200/Image via screencap]

Create Incredibly Realistic Facial Hair In Photoshop With Ease

$
0
0

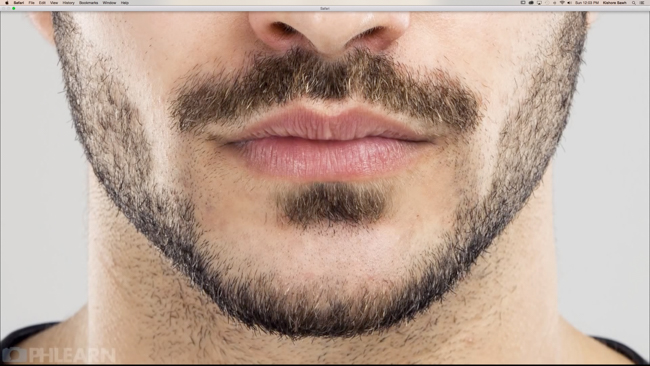
facial-hair-phlearn-aaron-nace-photoshop-photography-slrlounge-1

Men, on a whole, have a love hate relationship with facial hair. Either it grows too quickly, too sparsely, too slowly, or some measure in between. Those who don’t have a God given ability to grow a full on face carpet marvel (read: glare with envy) at those who do. Then there are the types like me whose facial hair grows at the rate of continental drift, and end up looking like some manner of rabid animal for months before something human appears, and listen bemused to the complaints from friends who have to shave at 7am and noon to avoid a 5 o’clock shadow at 2. So, getting facial hair to look just right in photos can, for many, be a challenge, and in order to combat this, Aaron Nace at Phlearn has put together a brilliant tutorial on how to create and manage facial hair in Photoshop.

What this tutorial is, more than anything else, is an exercise in creating custom brushes, and understanding how to see and manage uniformity for realism. The process as described by Aaron begins with creating a single hair with the brush tool, that needs to be as close to perfect as possible, as it will be the base for the custom brush. [To those of you who don’t yet have a Wacom tablet, it is possible to do this with a mouse or trackpad, but undeniably easier with a touch pen. See reviews on two options at opposite ends of the pricing scale here and here]

facial-hair-phlearn-aaron-nace-photoshop-photography-slrlounge-3

You will be creating a white background, surrounding the hair using the marquee tool, then going to Edit>Define Brush Preset, at which point you’ll be able to open the brush in the brushes panel.

[REWIND: How To Use The Amazing Patch Tool In Photoshop | Aaron Nace]

Within the brush menu, your options are as varied and customizable as you could want, and probably more so. I suggest taking heed of Aaron’s advice and playing around within this section to get a grasp of what is possible. It is in this section, when alterations are made to the angle jitter, scattering, opacity etc, that the realism starts to take shape, and when you’ve finished here, it’s a simple matter of painting on the face with some variance in color and size. This variance is an absolute necessity for rendering a realistic look.

facial-hair-phlearn-aaron-nace-photoshop-photography-slrlounge-1

facial-hair-phlearn-aaron-nace-photoshop-photography-slrlounge-2

As always, if you are a fan of Aaron’s teachings (and who isn’t?), be sure to check back here for updates, and follow along with Aaron on YouTube and Phlearn. You should also consider becoming quickly adept at Photoshop with the Phlearn Photoshop 101 & 201 sets as they are extremely comprehensive, and will have you quickly doing things with Photoshop you may have otherwise thought too complex, or didn’t even know you could do.

Source: Phlearn YouTubeImages are screen captures from featured video

The Best Way To ‘DeFish’ Your Fisheye Images | Video

$
0
0

Fisheye lenses are great for shooting super wide fields of view, but the distortion is so extreme that sometimes you may want to try and ‘defish’ your fisheye images. There are several ways of doing so, with varying results, and today, I wanted to share with you the best way I have come across yet.

de-fish-fisheye
The tutorial below comes to us from Ian Norman, and his great YouTube channel. In the video, Ian talks about the usual way people try to correct lens distortion: through a lens profile correction in Photoshop or Lightroom. He demonstrates how this can work well for normal lens distortions, but on fisheye lenses, the ending results are hardly usable.

[RELATED: 5 Tips For Shooting The Moon]

Ian goes on to show us how he ‘de-fishes’ his fisheye images in Photoshop, in a way that makes the final result not only usable, but looking really good too. I have honestly always stayed away from fisheye lenses due to the distortion – I hate it. But using this method, I can see myself giving this a try in the future.

[Via Ian Norman on Youtube]

Using Color Theory To Make Your Photos More Appealing & Harmonious With Photoshop

$
0
0

photoshop-tutorial-color-theory-wheel-aaron-nace-phlearn-slrlounge-photography-2

With a little study of art history and maybe some formal art instruction, color theory is bound to arise very quickly. How much time you spend on it can vary, as color theory collectively covers vast numbers of concepts, and in no small amount. In fact, the study of color theory could have you reading through volumes of information.

When broken down to the most basic facets though, you will be presented with the color wheel first created by Sir Isaac Newton, and what it does, color harmony, and then theories on how colors interact with each other. It’s a whole lot of information that you frankly don’t need to be entirely aware of, but would benefit from learning and incorporating the basics.

photoshop-tutorial-color-theory-wheel-aaron-nace-phlearn-slrlounge-photography-1

In this Phlearn episode, Aaron Nace goes into a little practical knowledge of color theory, and the importance of using its complementary colors to create a compelling image, and how to input those colors using Photoshop. Complementary colors are ones to be found opposite each other on the color wheel, so having a visual reference is immensely helpful. color. Adobe.com is a highly useful resource for just this.

[REWIND: Into Eternity | An Emotional & Haunting Timelapse Inspired By A Man Who Ended His Life]

Essentially what you’ll see demonstrated here delivered in Aaron’s hallmark charming and entertaining fashion, is the implementation process of some color theory using Photoshop. Using a screenshot from Adobe’s color wheel site and adding it as a layer to your working image, you can sample the precise colors you want to incorporate from the wheel. Getting this done requires a series of layers and a few small tricks which Aaron will seamlessly teach you how to use.

photoshop-tutorial-color-theory-wheel-aaron-nace-phlearn-slrlounge-photography-3

photoshop-tutorial-color-theory-wheel-aaron-nace-phlearn-slrlounge-photography-4

Whether you want to plan your shoots keeping the color theory of complementary colors in mind, or you want to take one of your photos and make it more memorable and visually harmonious, color theory is something to always consider, and this is great way to implement it after the shutter release button’s been clicked.

As always, if you are a fan of Aaron’s teachings (and who isn’t?), be sure to check back here for updates, and follow along with Aaron on YouTube and Phlearn. You should also consider becoming quickly adept at Photoshop with the Phlearn Photoshop 101 & 201 sets as they are extremely comprehensive, and will have you quickly doing things with Photoshop you may have otherwise thought too complex, or didn’t even know you could do.

The Best Way To Create, Use, & Alter Lens Flares In Photoshop

$
0
0

phlearn-aaron-nace-lens-flare-photoshop-tutorial-slrlounge-photography-1

Lens flares! Incredibly effective at bringing more interest to an otherwise bland image, and perhaps just as effective at showing a photographer/retoucher doesn’t know what they’re doing if they’re placed wrong in post. So it begs the question, if one wants a lens flare in the image and it hasn’t been created in camera, when is it appropriate, and how do we get them to look real? Aaron Nace has your answers – quelle surprise.

In this tutorial, Aaron will show you in about the time it takes to medium boil an egg, how to create and manipulate a lens flare in Photoshop, and how to think about the approach so you don’t put a flare in a place where it doesn’t belong.

phlearn-aaron-nace-lens-flare-photoshop-tutorial-slrlounge-photography-2

Simply, a lens flare is only going to appear in an image when there is a light source in front of the camera, pointing in its direction. If the light source is front lighting the subject, and pointing away from the camera, then there will be no flare – it requires backlighting. In the example image used, there are two large lights that are perfect candidates for flare additions.

[REWIND: Using Color Theory To Make Your Photos More Appealing & Harmonious With Photoshop]

phlearn-aaron-nace-lens-flare-photoshop-tutorial-slrlounge-photography-5

First step is to create a stamp visible layer (Ctrl/Cmnd+Shift+Alt/Opt+E), which is a total copy of the entire image (and edits thus far), then Filter>Render>Lens Flare. In the dialogue box that appears, you can move the flare around to a position that suits, but keep in mind it makes most sense to keep the flare above/near the light source. At this point, you can choose types and intensity of flares also.

This is where this gets interesting. Once you’ve applied it to the layer, it won’t look very real, but the flare will be locked to the image layer so you can’t edit it alone. To do this, you’ll simply hit Shift+Delete and fill layer with Black. Then go to the Filter menu and select the very first option which will repeat the last filter you’ve applied – in this case, it’s the flare. Then, select Screen blending mode which will cause the blacks to vanish, and you’ll have a flare above the background image to be adjusted as you like. You can adjust the color, opacity, and Aaron recommends adding some Gaussian Blur to bring a better sense of realism. Brilliant, and easy.

phlearn-aaron-nace-lens-flare-photoshop-tutorial-slrlounge-photography-1-2

Before (Top) & After (Bottom)

As always, if you are a fan of Aaron’s teachings (and who isn’t?), be sure to check back here for updates, and follow along with Aaron on YouTube and Phlearn. You should also consider becoming quickly adept at Photoshop with the Phlearn Photoshop 101 & 201 sets as they are extremely comprehensive, and will have you quickly doing things with Photoshop you may have otherwise thought too complex, or didn’t even know you could do.


Basic Channel Swapping: A Quintessential Guide To The World In Infrared

$
0
0

World In Infrared Channel Swapping

Before I begin, I would like to ask everyone a vaguely related question: How much post-processing is TOO much post-processing? To even attempt an answer for that, let’s look at what may be considered one of the most virginal forms of photography: Film.

While purists and transitionaries will indefinitely clutter internet forums with their heated debates of whether photographic film is truly an analog technique or not, one thing remains certain: changes recorded by silver halide crystals suspended within photographic emulsion during a split-second exposure creates the most tangible rendition of light possible at that moment.

The photographer (in the least involved part of the photographic process) simply holds the camera still while the sun, brandishing a metaphorical paintbrush, makes an imprint of the scene into the film not really any different than a cat leaves paw prints in wet cement. Much more than a digital rendering of 0’s and 1’s on an LCD screen, the strip of plastic you hold in your hand contains a ‘mold’ of visible reality.

But Does Film Truly Represent Reality?

35mm Fujifilm Superia

As you can see from this developed 35mm Fujifilm Superia negative, it doesn’t. The sky isn’t red, the ocean isn’t purple and clouds aren’t black. Before we can ‘cast’ this slice of time into a glossy 6×4 or an 18 megapixel Facebook profile picture, a significant amount of post-processing must first be performed before the photo will resemble what we see with our eyes.

In the case of 35mm negative film, this entails vats of chemical cocktails (such as the C-41 process) and a complete color/tone inversion. For digital photography, it’s a series of electronic demosaicing algorithms, white balance adjustments and brightness/contrast/noise filters.

Luckily for all the aspiring photographers who don’t know what their bayer array does, this complex process has been streamlined into the very structure of programs like Adobe Photoshop & Lightroom. Automated digital image processing is so inherently fundamental to DSLR operating systems circa ‘14 that most people are not even aware that it happens.

[REWIND: A QUINTESSENTIAL GUIDE TO THE WORLD IN INFRARED: COLOR PROCESSING]

As I stated in my previous article, A Quintessential Guide To The World In Infrared: Color Processing, *technically* there is no such thing as ‘color’ in infrared – only light being reflected and absorbed. ‘Color’ is a perception that results from the way our brain processes wavelengths of visible light. As a result, true infrared can only be measured in terms of tonality (darkness/brightness), which is essentially, but not exactly, black and white.

Why is it then (you may ponder), are my IR shots (as well as so many others) rendered with such vibrant (albeit slightly abnormal) color?

The Answer Lies In The Near-Infrared Spectrum…

I use a 720nm IR-filter and the visible spectrum extends until approximately 700nm, so a small amount of visible light will inherently ‘leak’ through the filter and into my final images. Because the closest humanly perceptible color to this particular IR-filter is red (≈ 620 – 740nm), the entire photo will take on a deep tint of reddish-burgundy. Properly adjusting the white balance to something ‘neutral’ shifts the red tint into more distinguished shades of blue and yellow (This tends to be the default color scheme of digital near-infrared photography). In this sense, as with any color-infrared photography, the resultant colors are false and do not represent anything more than the reflection and absorption of IR light.

FALSE COLOR?! Before anyone accuses me of being a manipulative Photoshop artist rather than photographer of the natural world, let me enlighten you to a few false color applications you’re probably already familiar with…

Thermal imaging uses a psychedelic gamut of false rainbow colors to represent minuscule changes in temperature that would otherwise be seen as near-indistinguishable gray-scale values:

Aerial surveillance film (Such as Kodak Aerochrome) and satellite (LANDSAT) imagery employ vibrant, but false color schemes to distinguish geological features and assess aspects such as vegetative health:

LANDSAT 7

These Landsat 7 images of Washington D.C., Baltimore and the Chesapeake Bay use bright red to represent near-infrared light reflected from vegetation.

The vast majority of the universe we know through astrophotography is usually rendered in false color because the vast majority of the universe is optically invisible to us:

Horsehead Nebula 650

This image of the Horsehead Nebula by the European Southern Observatory (ESO) is a composite of 3 different photographs taken in 3 different spectrums.

Compared to the same nebula as seen in visible light…

Horsehead Nebula Visible

A photo Nick Cox took of the same nebula with his telescope and a D300.

False color is simply a means to bring tone, color and subsequently, a discernible form to what we cannot perceive… and digital infrared photography is no exception.

Looking at this white-balanced 720nm infrared photo I took of a busker with his bass guitar at the Old Fourth Ward Arts Festival in Atlanta, the false color scheme is obvious: The sky (a known absorber of IR light) is yellow/orange, while vegetation and clothing (known reflectors of IR light) appear blue.

world in infrared

But what if I want my sky to be blue? What if I want to use colors to articulate an atmosphere or idea? What if I want complete control over every color output in the photo?

It brings me great pleasure to divulge some info, currently in circulation on the streets, that speaks of a solution to this problem nearly as old as photography itself: Channel Swapping – i.e. mapping what would normally be perceived as red to, say, blue for example. All false color rendering is built upon the premise of channel swapping.

Loved around the world for its ability to bring a sense of ‘normalcy’ to digital infrared photography (in part, by rendering the sky blue once again), I’ll demonstrate one of the most basic color remapping maneuvers:

The Red/Blue Channel Swap

Step 1:

Open your white-balanced infrared image in Photoshop then navigate to ‘Image’ > ‘Adjustments’ > ‘Channel Mixer’ (below):

World In Infrared Channel Swapping

Step 2:

Without making any adjustments yet, we can observe that the red output channel consists of 100% red (below):

World In Infrared Channel Swapping

…and the blue output channel consists of 100% blue (below):

World In Infrared Channel Swapping

… as they both should.

Step 3:

The idea is now to ‘swap’ the color source of both corresponding output channels. In the red output channel, set the red source to 0% and the blue source to 100% (below):

World In Infrared Channel Swapping

You should observe the colors of the image begin to change…

Step 4:

Likewise in the blue output channel, we must set the blue source to 0% and the red source to 100% (below):

World In Infrared Channel Swapping

Click ‘Ok’ and the channel swap is complete.

World In Infrared Channel Swapping

What was once a sepia-toned, apocalyptic-seeming sky has been replaced by a remarkably familiar shade of deep blue… but something is not right. The darkness of the sky resembles late evening even though this picture was taken at noon? Ah, it’s because the atmosphere of the Earth absorbs much IR radiation, causing it to appear dark!

The complimentary pale yellow/orange colored vegetation looks more like a layer of snow (thanks to reflected IR light) than the actual surface of the leaves. Either way, it firmly cements this surreal slice of time as a scene in an alien world.

Looking at things from this perspective, digital infrared photography is no less credible as an accurate depiction of reality as any authentic visible light photograph – film or digital. It’s not that an unnaturally large amount of post processing is required to obtain a ‘normal’ looking IR image, it’s just a process that must be done manually. If anything, this leaves the photographer with virtually unlimited control over the outcome of the final image.

And as long as you keep your artistic license on you at all times, no laws are being broken.

How To Make A Polaroid Framed Picture In Photoshop | Aaron Nace

$
0
0

polaroid-instant-film-instax-fuji-photoshop-phlearn-aaron-nace-photography-slrlounge-4

Polaroid/Instant film had its hay-day some decades ago now, and aside from their somewhat prevalent use within modeling agencies, their use had become very sparse. Safe to say, however, instant film cameras have been steadily making a comeback thanks in no small part to Fuji.

But perhaps most instant cameras aren’t offering the control or looks you want, or you just don’t have one, but you still want to have that look, complete with polaroid frame and all. Well, Aaron Nace and the good people over at Phlearn have put together something to quench your instant film thirst. Here’s how to make a Polaroid framed picture using Photoshop.

polaroid-instant-film-instax-fuji-photoshop-phlearn-aaron-nace-photography-slrlounge-1

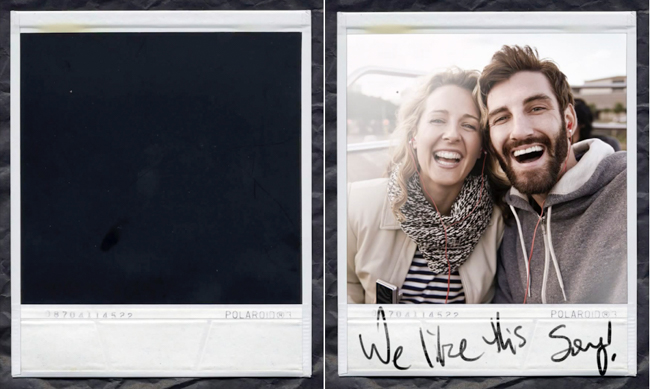
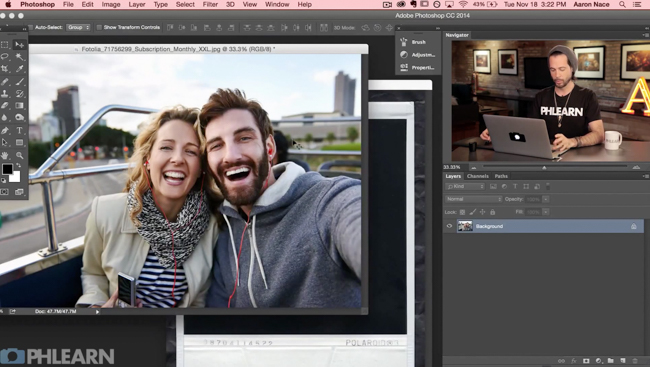
To achieve this look you will, in fact, need two pictures: One of your subject and one of an actual Polaroid. You’ll be opening up both images in Photoshop, and dragging the image of the Polaroid onto the image of the subjects. You’ll then select the black square (where the image will be) on the frame and apply a layer mask so your subjects show up only within the center of the Polaroid.

From this point on, it’s a simple matter of adding effects to give your image a stylized, aged, Polaroid feel. You can do this by utilizing the hue/saturation layer and picking any hue you like, whilst making sure the colorize button is selected, then clip it to the layer underneath. To add to the realism, you’ll not want the edges within the frame to be too sharp, so applying a gaussian blur to the edges will be of some use.

[REWIND: The Best Way To Create, Use, & Alter Lens Flares In Photoshop]

polaroid-instant-film-instax-fuji-photoshop-phlearn-aaron-nace-photography-slrlounge-2

Lastly, if you’re so inclined, you can add some writing to the image. To do this with a mouse or trackpad is an absolute pain, and a gargantuan task to get it to look remotely natural, so you’re better suited to use a pen tablet. If you don’t have one at your disposal, you can write on paper, scan it and put that scan onto your image, then using the sliders in (hold down the option key while adjusting) Blend-If to really make the text appear as if it’s on the print.

You can download the exact same Polaroid stock image used in the tutorial, here.

As always, if you are a fan of Aaron’s teachings (and who isn’t?), be sure to check back here for updates, and follow along with Aaron on YouTube and Phlearn. You should also consider becoming quickly adept at Photoshop with the Phlearn Photoshop 101 & 201 sets as they are extremely comprehensive, and will have you quickly doing things with Photoshop you may have otherwise thought too complex, or didn’t even know you could do.
Create Lego Portraits From Any Photo With This Beginners Tutorial

$
0
0

Some photographers complain that plastic is ruining the aesthetics of photography; from plastic bodies to lens mounts, and even plastic lenses. There are some arguments against this poly-carbonate push, like for Canon’s beloved 50mm f/1.8 or the rise of Holga. Nowadays, camera bodies and lenses are not the only things clad in plastic – a tutorial from Photoshop Tutorials shows how to make your images look like the are made from plastic! Plastic Legos to be exact.

Lego-Portraits-Photoshop-Tutorial-2

First, this quick and easy beginner’s guide shows you how to pixelate your photographs to the point where they begin to become indistinguishable. Next, there is a trick to how to create scale-able brick patterns to make your image look like it was made from 1×1 brick pieces; a simple tweak can alter the look of a 2×2 or a 2×4 brick. Once that step is complete, the image will look too realistic, so the colors must be compressed to reflect the palate that Lego offers.

[REWIND: How To Make A Polaroid Framed Picture In Photoshop | Aaron Nace]

At around 7 minutes, the tutorial goes over many of the features of Photoshop at a very quick pace; you may have to start and stop the video a couple of time to follow along.

Create Lego Brick Mosaics From Any Photo

To take your Lego images to the next level, for $5, Brick-A-Pic will take that lego-ize portrait and give you the shopping list and building instructions to help you create one of a kind artwork. A fun and unique gift for that Lego lover in your life!

[Via Photoshop Tutorial Youtube / Images Screen Captures]

How To Create & Replace A Custom Background In Photoshop

$
0
0

phlearn-aaron-nace-photoshop-adobe-custome-backgrounds-photography-slrounge-1

There are a myriad of reasons you may want to remove or replace the background of a particular image, and even more options for the alternatives to use – as varied as your immagination. You can make custom patterned backgrounds, to making the background the scene from a different season, and surprisingly, getting it done isn’t all that difficult or time consuming if you know what you’re doing, which is precisely what Aaron Nace is there to teach you.

One of the great things about this tutorial is that the tricks and steps you’ll learn along the path to the finished product are so applicable to other tasks you do in Photoshop. The obvious one in this particular case is how Aaron explains how to separate your subject from a background, even while dealing with the particular headache that can be the masking of hair, using the Refine Edge tool. Learning how to do that alone makes this worthwhile, and the approach takes something that can be daunting, like the use of the Magic Wand, and shows how easy it actually is to use, prompting you to use it more regularly.

[REWIND: How To Make A Polaroid Framed Picture In Photoshop | Aaron Nace]

Whether you have a varied use for the step and repeat portion of the tutorial is more questionable, but again, the applications for it beyond this tutorial are there since it doesn’t limit you to applying one look, and the wider understanding of how Photoshop works will come in handy. Here are some look examples:

phlearn-aaron-nace-photoshop-adobe-custome-backgrounds-photography-slrounge-4

phlearn-aaron-nace-photoshop-adobe-custome-backgrounds-photography-slrounge-5

Thoughts

Sometimes when we cover these Phlearn tutorials, it never ceases to strike me that there is such a massive audience that eats up the great material they put out, and really love how Aaron brings the information across in such a fun and easily digestible way.  Most of the videos are beginner to intermediate, and those of you in that group would benefit from taking a look at the Phlearn Photoshop 101 & 201.

phlearn-aaron-nace-photoshop-adobe-custome-backgrounds-photography-slrounge-2

There are troves of Photoshop how-to’s for free online, and you could slot Phlearn’s YouTube channel into that, but the benefit of this system is that it starts you from the ground up, giving you a full understanding of Photoshop for photographers. It’s a carefully curated curriculum versus sporadic hints and tricks, and that makes all the difference, really, in becoming actually proficient and further creative. I was quite adept at Photoshop and almost a year ago now went through both 101 & 201. It has given me a healthy wake-up call to my own ignorance in using Photoshop – one of those ‘a-ha’ moments. That Aaron is anything from monotone, and speaks to you like your buddy all aids in this.

Anyway, just a thought for those of you who are looking to bridge the gap between what you want to be able to do in Photoshop and what you currently can do, and have a proper understanding of what’s going on in this program we use so much. Happy editing.

A Solid, Simple & Effective Method For Retouching Mature Skin

$
0
0

phlearn-photoshop-slrlounge-skin-retouch-photography-4

It’s amazing how fast our bodies begin to rebel in both form and function. When we’re young, time seems to move as if being nudged by the gentlest summer breeze, and nothing we ate or did would really show, and the beauty of youth seemed to know no bounds. Then one day that changes. Time presses the fast forward button, and we wear everything we eat. A night of lost sleep wears itself under our eyes; alcohol and little water weathers our skin, and cheesecake seems to come in and never leave – a second on the lips, forever on the hips and all that…

While most retouching tutorials tend to focus on perfecting a youthful image, there’s much less out there with a focus on dealing with the issues listed above. Retouching the mature features and skin of both men and women require a little different approach. You can’t go for full on removal of lines and pores, so perfection isn’t quite the aim – and that’s a little harder to deal with. Subtlety is the name of the game, as it should always be really, but particularly in this case. In this tutorial, Aaron Nace will show you a simple approach to retouching a mature person’s face, and gives pointers on what in particular to look out for.

phlearn-photoshop-slrlounge-skin-retouch-photography-1

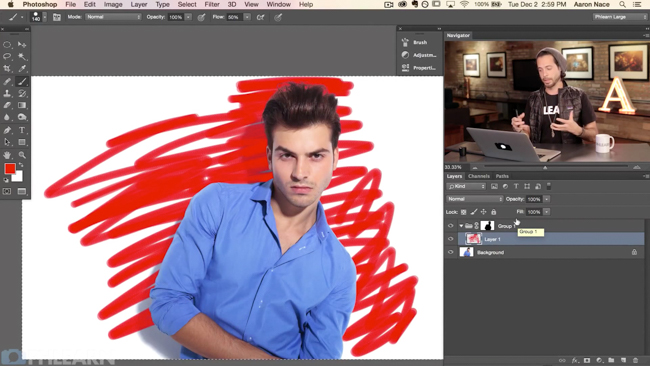
Much of the focus of the tutorial is on lessening the intensity of the imperfections. The aim is not to make the face devoid of imperfection, but rather to temper it. So, Aaron shows you how to use the healing brush tool to paint over lines and wrinkles, and how to use layers and opacity to find just the right level of subtle.

phlearn-photoshop-slrlounge-skin-retouch-photography-3

[REWIND: The Best Way To Create, Use, & Alter Lens Flares In Photoshop]

He also goes over how to deal with shadows easily, and how to add color back into the skin and eyes, as they naturally desaturate over time. For those of you who are a little intimidated with frequency separation, this is a great method to try, and sure to come in handy for anyone.

As always, if you are a fan of Aaron’s teachings (and who isn’t?), be sure to check back here for updates, and follow along with Aaron on YouTube and Phlearn. You should also consider becoming quickly adept at Photoshop with the Phlearn Photoshop 101 & 201 sets as they are extremely comprehensive, and will have you quickly doing things with Photoshop you may have otherwise thought too complex, or didn’t even know you could do.

Smart Objects & Linked Objects – What They Are, Do, And How To Use Them

$
0
0

photoshop-phlearn-tutorial-aaron-nace-photography-slrlounge-2

Smart objects in Photoshop are all blessing, no curse. Well, unless for some reason they are removed in which case you’ll be missing them grossly. They can also be a bit unnerving for many Photoshop users, but they needn’t be, and in this episode of Phlearn, Aaron Nace does a good job holding your hand and walking you through the applications and usage of smart objects, smart filters, and smart linked objects.

Why would you want to use a smart object? The reasons, as you’ll see are vast, but it generally comes down to flexibility. Smart objects link back to a source file, so no matter what you do to the image, from scaling to filter etc, it will retain its quality. If you chose not to do this, you would lose quality with each process.

photoshop-phlearn-tutorial-aaron-nace-photography-slrlounge-4 photoshop-phlearn-tutorial-aaron-nace-photography-slrlounge-3

The beauty, also, is that it’s literally just a click to turn an object into a smart object – right click on the layer, and choose ‘Covert to Smart Object.’

Once you’ve turned your layer into a smart object, any filters you apply will be equally ‘smart.’ They will cascade underneath the chosen layer, and each of them will be entirely editable. You can turn the effects on and off, and can even apply layer masks, etc.

The idea of the linked object is simple, and the purpose and usefulness of it is too – it allows you to update multiple images at once, in multiple documents. Essentially, any change made to the original file gets immediately applied to all linked documents.

As always, if you are a fan of Aaron’s teachings (and who isn’t?), be sure to check back here for updates, and follow along with Aaron on YouTube and Phlearn. You should also consider becoming quickly adept at Photoshop with the Phlearn Photoshop 101 & 201 sets as they are extremely comprehensive, and will have you quickly doing things with Photoshop you may have otherwise thought too complex, or didn’t even know you could do.

An Easy Way To Swap Heads In Photoshop | Aaron Nace

$
0
0

phlearn-photoshop-swap-heads-tutorial-slrlounge-photography-1

It may come across a little strange so some, but swapping heads in Photoshop can be a lifesaver, and is done with more frequency than you might imagine.

Here’s one scenario where you may benefit from this: You’re shooting a a rapid sequence of images of a single person or group, and in one image the pose is perfect, and in another image the face is perfect, and if only you could mend the scene to by bringing the two best parts together…

If you’re shooting in quick succession, the likelihood is that most of the other qualities of the image will be very similar, from pose, to exposure, and background, so swapping the heads becomes easier. But even if that’s not the case, it’s still possible, and Aaron Nace will show you just how to go about it to end up with a natural looking result, and it’s not very difficult.

phlearn-photoshop-swap-heads-tutorial-slrlounge-photography-2

Essentially, you’ll select the two images you want to use, and drag the one with the correct head onto the other. Then, you’ll make a selection around the head which includes some surrounding area, and duplicate it onto a new layer. Through a short series of actions like changing opacity of the new layer, and the use of easy layer masks, you’ll generally be able to easily paint over the image to reveal what you want.

[REWIND: Smart Objects & Linked Objects – What They Are, Do, And How To Use Them]

phlearn-photoshop-swap-heads-tutorial-slrlounge-photography-3

phlearn-photoshop-swap-heads-tutorial-slrlounge-photography-4

As always, if you are a fan of Aaron’s teachings (and who isn’t?), be sure to check back here for updates, and follow along with Aaron on YouTube and Phlearn. You should also consider becoming quickly adept at Photoshop with the Phlearn Photoshop 101 & 201 sets as they are extremely comprehensive, and will have you quickly doing things with Photoshop you may have otherwise thought too complex, or didn’t even know you could do.


The Best (And Worst) of Photoshop {2014 Edition}

$
0
0

It’s the end of the year and as you’re finishing the last of that egg nog, vacuuming up drying pine needles and reflecting on the last 12 months, allow us to reflect along with you at some of our most popular Photoshop-related articles of the year.

[REWIND: OUR TOP 10 TIPS FOR JUMPSTARTING YOUR PHOTOGRAPHY CAREER {2014 EDITION}]

2014 was the year of Photoshop. Almost a quarter of a century old, Photoshop became either the savior or the culprit, the butt of jokes or the life of the party. Whether it was a foriegn government using it poorly for propaganda or singers panning it for its role in the skewed standards of the beauty industry, Photoshop saw much media attention in 2014. Here are some of the best (and the worst) of Photoshop this year.

Best Photoshop Tutorial

Want to remove an unsightly trash can in your photograph? How about an ex-husband? If you want to remove anything from a photo using Photoshop, here is one of our most popular Photoshop articles with this tutorial: LEARN HOW TO REMOVE ANYTHING FROM A PHOTO USING PHOTOSHOP

photoshop-phlearn-tutorial-aaron-nace-removal-clone-video-photography-girl-1

Most Interesting Photoshop Experiment

In this experiment, Freelance journalist Esther Honig sent out an unaltered photograph of herself around the world to 40 freelance Photoshop retouchers in 25 different countries around the world in an effort to examine the beauty standards in different cultures. Her only request to the retouchers was to “make me beautiful.” The results were not only interesting, some were hilarious in their amateur-ish renditions and others were thought-provoking. Read ‘MAKE ME BEAUTIFUL’ – PHOTOSHOP SERIES EXAMINES BEAUTY STANDARDS IN 25 COUNTRIES here.

before-after-Esther-Hoenig-1

Most Controversial Photoshop Article

It’s easy to overdo it in Photoshop. An extra bump here, two nudges there and you may seem to have a pretty good looking photo – at least in your eyes (case in point, the project above). One Congresswoman proposed a bill to regulate the excessive use of Photoshop due to the damaging effects it has on body image in our society. What do you think? Should the government have a say in how we edit our images?

Affordable Care Act

Most ‘Questionable’ Use of Photoshop

Narciso Contreras, a Pulitzer Prize-winning AP photographer was fired after he admitted to altering an image taken during the conflict in Syria. He digitally removed a colleague’s video camera from a photograph that had nothing to do with the photo. He also stood to have all of his photographs (almost 500 of them) removed from the AP news archive. Did the punishment fit the crime? Wa the AP right in firing Contreras?

Mideast Syria

Most Absurd Photoshop Fail

There were so many contenders in this category. In fact, if you have some time and want a few laughs, see these examples of terrible retouching, but this one really stands out. One because the Photoshop infraction was done so poorly and secondly, it was done by the second largest discount retailer in the US, Target. See their terrible hack job on this poor model.

Target-photoshop-fail-1


Best Photoshop Music Video

Many singers were vocal about Photoshop and their dislike of being transformed into a perfect and unrealistic beauty standard, using their platforms to voice their opinions through their music videos, at speaking events, or to the media; Lady Gaga spoke against her Glamour Magazine cover, where she is drastically Photoshopped, at a Glamour magazine event and Colbie Caillat made a video with her “un-photoshopping herself.” The music video that was an SLR Lounge favorite in terms of page views was this one from French singer, Boggie.

Best Non-Use of Photoshop

Who needs Photoshop when you have makeup? These before and after transformations are nothing short of amazing. Yes, you can make an argument for good lighting and posing, but for any of you who have gone home with a ten and woken up with a two, well, you know what I’m talking about. Read AMAZING ‘BEFORE’ AND ‘AFTER’ PHOTOS: MAKE-UP ARTIST TRANSFORMS A FACE WITHOUT THE USE OF PHOTOSHOP.

P.S. Okay, so this one wasn’t quite from the year 2014, but it’s one of my favorite articles about not using Photoshop and just from the dramatic changes in each photo that I had to share it.

before-and-after-makeup-photos-vadim-andreev-31

Most Helpful Quick Photoshop Tip

Pye gives this quick tip to help you non-destructively edit an image inside Photoshop

Check out some of our other articles related to Photoshop and let us know what your favorite one is in the comment section below!

Focus Stacking and Blending in Adobe Bridge and Photoshop: A How To Guide

$
0
0

In this video, we’re going to give a quick tutorial on how to use Photoshop’s Auto-Align and Auto-Blend features.  We’ll be taking images captured in RAW from Nikon’s new D750 and a Rokinon 14mm f/2.8, processing them in Adobe Bridge CC using the SLR Lounge Preset system which just became available for Bridge / ACR, and then blending them quickly and effortlessly in Photoshop.  The goal here is to create an extremely sharp image that includes detail at a very close distance (just a few inches from the lens), all the way to near-infinity.  Watch the video below, or keep scrolling down for a brief written outline.

Focus Stacking For Maximum Depth of Field

The Original Raw Frames

As you can see in the 100% crops below, none of the images captured include perfect focus:

focus-stacking-hdr-landscape-tutorial-adobe-bridge-photoshop-crop-1

Even at f/13 on a 14mm lens, obtaining a sharp horizon / infinity and a sharp anemone at ~6-10″ away is not possible.

I could stop down to f/22, and maybe just barely pull it off, but the overall image would start to get a little softer anyway due to diffraction, thus making the point almost moot.

focus-stacking-hdr-landscape-tutorial-adobe-bridge-photoshop-crop-2

When focusing to get optimal sharpness on the closest subjects, the horizon gets too blurry.

Shooting Technique For Focus Stacking

By slowly racking focus from infinity to ~10″, I have a set of 4 images that offer me perfect sharpness throughout the entire image area.

The increments that you rack focus at can vary depending on your focal length, aperture, sensor size, and desired result.  Sometimes you’ll need to create many more than just 3-4 images (especially if your lens is not as wide as 14mm!).  I highly recommend performing your own tests with your own favorite landscape lenses!

After preliminary post-production on the raw images in Adobe Bridge, we bring them into Photoshop, and layer them all together by simply cutting and pasting the last three images onto the first one. Next, don’t touch anything!  Just go to Edit > Auto-Align Layers.

focus-stacking-hdr-landscape-tutorial-adobe-bridge-photoshop-layers-1

I usually leave it on “Automatic”, and sometimes I try it with Geometric Distortion turned on, sometimes off.  I did it with it on in the tutorial video, but tried it again with it turned off and I liked the results better!  Each scenario can be different, so when in doubt, see what both look like.

The next step is again to not touch anything, and just go to Edit > Auto-Blend Layers.

focus-stacking-hdr-landscape-tutorial-adobe-bridge-photoshop-layers-2

This process has really been perfected in the latest versions of Photoshop CC, and I’m continually impressed with how well it can work!  Be sure to select “Seamless Tones and Colors” if it is un-checked.

focus-stacking-hdr-landscape-tutorial-adobe-bridge-photoshop-layers-3

The results should look like this, with layer masks that reveal only the sharpest areas of the image, from the horizon to the foreground.  Sometimes, areas of clear sky will get a little wonky, so zoom in and check those out for telltale errors in alignment.  Ideally though, your tones should all match perfectly so there shouldn’t be any visible “seams” whatsoever.

Since the process is so easy and automated, once I check the layer masks for errors, (usually on hard edges), I’ll just flatten the image to save space on my computer, and save it as a LZW TIF file, or a PSD file.  If you save your files as TIF, you’ll be able to re-edit them a little bit in Adobe Camera Raw, which comes in handy for me personally. (Anyone who uses Lightroom exclusively can save in either format, as LR is able to handle both).

focus-stacking-hdr-landscape-tutorial-adobe-bridge-photoshop-750

Nikon D750, Rokinon 14mm f/2.8, FotoPro C5C Tripod
Dynamic Range: Single Exposure
Focus: Four-Image Focus Rack
Post-Production: Adobe Bridge CC / Camera Raw,
Vivid Base Foundation Preset & Dynamic Range +++
Minor Final Adjustments

The SLR Lounge Preset System – For Adobe Bridge and Adobe Lightroom

Our Lightroom Preset System V6 for Adobe Lightroom 5 has been met with incredibly positive response, and now it is finally available for Adobe Bridge and Camera Raw!  Like the SLR Lounge Preset System v5.1, these new Camera Raw Presets are compatible with both Adobe Creative Cloud (CC) and CS6, but not CS5 or older.

[Click Here to Buy]

These presets are used in Adobe Bridge, and the Camera Raw interface of Adobe Photoshop.

How to Shoot For & Create A Panorama In Photoshop

$
0
0

panorama-photoshop-aaron-nace-phlearn-slrlounge-photography-1-2

Fair to say everyone appreciates a good Panorama. Sometimes, a typical single frame image doesn’t quite translate the scope, or beauty, of a scene as you can see with your naked eyes. The panorama gets you a little bit closer to being enveloped in the scene, and clearly, this is something most of us like to do given the proliferation of panorama applications on phones and pano options on cameras today. While the apps and settings can do a good job, it’s unlikely going to give you something really phenomenal or worthy of a large print. To do this, stitching multiple images together will be your best bet, and even to do that, knowing how to take the images and then knowing how to process them in Photoshop is essential.

In the accompanying video, or rather the video to which this text accompanies, Aaron Nace takes some shots of Mt. Haleakalā (shot by fellow Phlearn team member and all ’round good guy, David J Crewe), holds your hand and guides you through the necessary steps to execute great shots for panoramas, and how to put them together and finish your image in Photoshop.

panorama-photoshop-aaron-nace-phlearn-slrlounge-photography-3

[REWIND: An Easy Way To Swap Heads In Photoshop | Aaron Nace]

If you’re a landscape shooter or a time-lapse shooter, some of this is probably already understood, but the tips on how to shoot are very valuable to anyone wanting to capture a great pano from a vacation. Some of the tips:

  • There’s a saying often spoken in photography, that there are large, heavy, sturdy tripods, and then there are bad ones. While this may be an exaggeration, it helps to have a good one when taking panoramas.
  • Shoot more images than you actually need to give yourself more cropping ground
  • Contrary to what you might think, shooting at 50mm or higher is better than shooting very wide, as it allows for less distortion.
  • You’ll want to choose an aperture that’s very sharp, and typically, that means shooting within the f/8 to f/11 range
  • Manually focus
  • Shoot using slower shutter speeds, which may require ND filters, to reduce distracting elements of motion.

Once in Photoshop, the program does most of the heavy lifting for you. Simply by going to File>Automate>Photomerge, then keeping everything on automatic, will stitch your images together and give you a panorama to work from, and presents each image as a layer. You can then toggle the layers on and off to see how they make up the pano.

panorama-photoshop-aaron-nace-phlearn-slrlounge-photography-5

Once you’re satisfied, you’ll merge all the layers, and then address image distortion by going to Filter>Lens Correction and adjusting the sliders as you see fit. At this point, you should mostly be concerned with cropping to your taste, and then filling in any blank areas using either the Content Aware tool, or clone stamp, and then, finally, adjust the final colors in the image to produce something really spectacular.

panorama-photoshop-aaron-nace-phlearn-slrlounge-photography-4 panorama-photoshop-aaron-nace-phlearn-slrlounge-photography-2

As always, if you are a fan of Aaron’s teachings (and who isn’t?), be sure to check back here for updates, and follow along with Aaron on YouTube and Phlearn. You should also consider becoming quickly adept at Photoshop with the Phlearn Photoshop 101 & 201 sets as they are extremely comprehensive, and will have you quickly doing things with Photoshop you may have otherwise thought too complex, or didn’t even know you could do.

3.2 Million Watched Minutes of Photoshop Education in 50 Videos | Photoshop Playbook

$
0
0

Photographers and Photoshop go hand in hand. Whether you are removing an unwanted object in the your otherwise perfect image or adding enhancements (ahem, *cough* Justin Bieber *cough*), the photo editing program is a skill that most photographers need to master.

I’ve had some interesting requests over the years as a wedding photographer. I’ve been asked to nip, tuck, remove and add in various objects like a Beverly Hills plastic surgeon. Learning Photoshop can be a long process though and learning it can be a bumpy ride of trial and error. The following index can help you speed up the learning process.

[REWIND: THE BEST (AND WORST) OF PHOTOSHOP {2014 EDITION}]

photoshop-playbook-index

In the last year, Adobe has released 50 episodes of their online series of short tutorials, Photoshop Playbook. Totaling about 3.2 million minutes watched, the videos answers the questions that are most asked of Adobe about Photoshop. Hosted by Bryan O’Neill Hughes, Photoshop Playbook is broken down into 5 seasons by topic.

Adobe compiled all 50 videos in one handy index, which you will find below. Of the 50 videos, the most popular Playbook tutorial was this one:

Photoshop Playbook: Making Fine Hair Selections

If you find some time on your hands and wish to further your Photoshop education, check these videos out:

PHOTOSHOP PLAYBOOK SEASON 1

PHOTOSHOP PLAYBOOK SEASON 2

PHOTOSHOP PLAYBOOK SEASON 3

PHOTOSHOP PLAYBOOK SEASON 4

PHOTOSHOP PLAYBOOK SEASON 5

[Via PetaPixel]

How To Add Interest with Freckles In Photoshop

$
0
0

phlearn-aaron-nace-photoshop-tutorial-freckles-custom-brush-slrlounge-photography-6

Redheads, or Gingers as they are ‘affectionately’ nicknamed, often are the butt of many a joke. I mean, they prove singlehandedly that Harry Potter was totally unreal – a ginger? With two friends? Come on now. Okay, only kidding, but really, one thing that redheads often have which make them the objects of my affection to photograph, are freckles. Freckles have the tendency to add a lot of dimension and interest in a portrait, and the fact that they are less common, and most often concealed, make them a great change of pace in a photograph, and particularly in black and white.

But what if you don’t know anyone with freckles, or no one is available in the time frame you want and you want to add that look into your portfolio, or just to have that different look? Photoshop is your best friend in this scenario, and Aaron Nace shows you how to add beautifully natural freckles onto your subject by way of extracting a pattern from a photo of granite, and making a custom brush from it.

phlearn-aaron-nace-photoshop-tutorial-freckles-custom-brush-slrlounge-photography-1

For the freckles to appear real, there must be less uniformity, and a degree of randomness. To best accomplish this, starting with an organic pattern/texture is advised, and in this instance, an image of granite proves to work well.

Building The Brush

Once the choice granite image has been selected, the ‘freckles’ must be extracted, and to begin, that requires selecting the range of color of the details we want to become the granite. Then, you would make a new selection, fill it with black, then a new layer and fill that with white to place under the black layer. What this does is leave black freckles on a white background.

Next, you would paint white around the edges of the document to remove any evidence of the shape being quadrilateral, which will make blending appear natural, because if the shape can be seen, then the illusion will be lost.

phlearn-aaron-nace-photoshop-tutorial-freckles-custom-brush-slrlounge-photography-2

Once that’s complete, you’ll resize the document and make it into a brush template by selecting Edit>Define Brush Preset. Within the options given, a little tweaking may be necessary to get it just as you want, by changing spacing, and shape, etcetera. Now, if you don’t fancy doing the legwork, the Phlearn Team has provided the very custom brush used in this episode, for you to download.

Brush Application

Once you have your brush created, it’s just a matter of applying it in a manner consistent with the size of your image, and to a degree that you like. Aaron points out that the closer the subject is to camera, the larger the brush will need to be, and creating the effects by using multiple layers will give more depth and have the freckles appear more real. Removing the freckles from any unwanted area is simply a matter of creating a layer mask and painting them away.

[REWIND: How to Shoot For & Create A Panorama In Photoshop]

phlearn-aaron-nace-photoshop-tutorial-freckles-custom-brush-slrlounge-photography-3

phlearn-aaron-nace-photoshop-tutorial-freckles-custom-brush-slrlounge-photography-5

Watch the video tutorial for an easy to follow along instruction on the process, and share with us your images. As always, if you are a fan of Aaron’s teachings (and who isn’t?), be sure to check back here for updates, and follow along with Aaron on YouTube and Phlearn. You should also consider becoming quickly adept at Photoshop with the Phlearn Photoshop 101 & 201 sets as they are extremely comprehensive, and will have you quickly doing things with Photoshop you may have otherwise thought too complex, or didn’t even know you could do.

Viewing all 349 articles
Browse latest View live