Whitening teeth in Photoshop is one of those things that all portrait photographers will all have to do at some point. When making alterations such as these, I always feel it necessary to point out that a light touch is usually best. It may seem obvious to some but I guarantee we’ve all seen some overdone images in which the teeth look so white they glow. If you think I’ve just described your images, stop now, it’s not a good look.
[REWIND: RAMBLINGS ABOUT RETOUCHING | IS “I’LL FIX IT IN POST” STILL A DIRTY PHRASE?]
The lengths to which we deem retouching to be acceptable will vary, and check out this recent article in which I discuss just that. However, regardless of subjective boundaries, I think we all have the same initial aim in mind: “I want to make my subject look better”. In my opinion, taking things like teeth-whitening too far has the opposite effect. Your subject WILL look worse. Rant aside, let’s get going with this 2-second teeth whitening technique.
How To Retouch Teeth In Photoshop In 2 seconds
The two second part of this teeth whitening technique is kinda cheating: use my action. All the action does is set everything up for you. Once run, you’ll end up with a few layers which will work the majority of the time. All you have to do is paint the effect onto the teeth in question.

Even though you could simply use the action and forget, I’m still going to take you through the setup. Why? Well, firstly it’s important for you to know how this stuff works. If you only ever rely on actions, you’ll never learn anything. You’ll always be asking, is there an action for this? Secondly, to get the most out of this method, you’ll need to make some little adjustments once the action has run.
How The Teeth Whitening Works
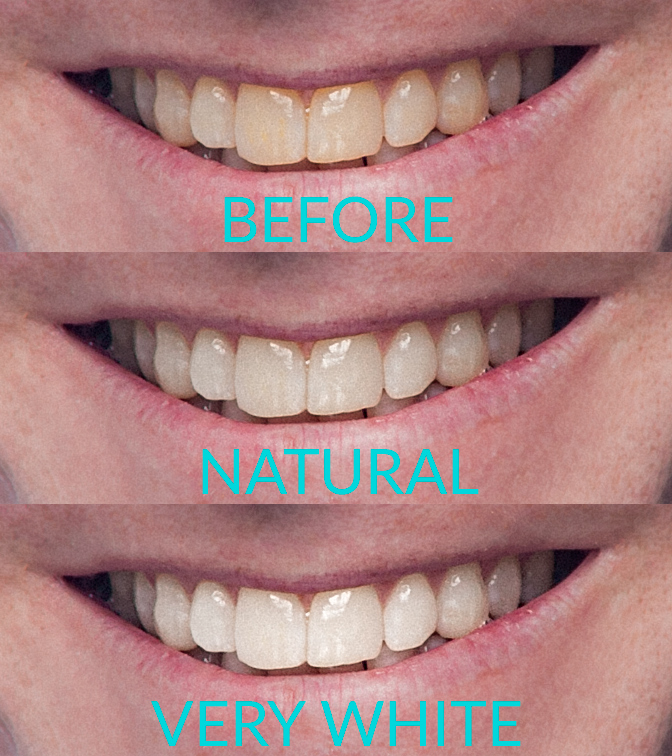
If you were paying attention at the beginning, you’d know that I take a less is more approach to retouching. I want my subject to remain who they are and look real. In certain circumstances, you may be asked to aim for perfection, but I always start with what’s natural and go from there. As such, you’ll notice a layer called “more whitening”. If you feel you want, you guessed it, more whitening, increase the opacity of that layer.
[REWIND: 4 WAYS TO RETOUCH SKIN COLOR IN PHOTOSHOP WE SHOULD ALL KNOW]
The “More Whitening” layer contains a blank, white layer, using the blend mode ‘Soft Light’. The effect has been made more natural by removing it from the shadows. To do so, I used Blend If. You can access the Blend If controls by double clicking on your layer, which will take you to the Layer Styles dialogue. By ‘ALT-clicking’ on the sliders at the bottom, you are able to gradually remove the effect from either the Shadows or Highlights. The final effect of this layer is controlled by opacity.

Removing The Yellow And Making It Look Natural
To remove the yellow, I add a Hue and Saturation layer. The master saturation is dropped a tad (-5) but the main adjustment is made within the yellow channel. By removing the majority of the yellow saturation teeth begin to look more white. Be careful here. De-saturate too much and you’re left with gray. I find -40 works most of the time but you may need to increase it slightly depending on the severity of the color. By adding a small amount Lightness the teeth take on a natural brightness.

The final step I take to whiten teeth in Photoshop is to add a Levels layer. If you simply desaturate the yellows it won’t look natural. I can’t give you a definitive answer as to why this is, perhaps it’s because whiter teeth will reflect light differently, not sure. Whatever it may be I find that boosting the highlights makes a big difference. However, it’s important to temper this boost with a slight darkening of the mid-tones. If not, it looks fake.

If you feel you need an extra boost to the whitening, I’d suggest increasing the effect of the Levels layer and / or tweaking the sliders in Blend If on the “More Whitening layer.
Teeth Whitening Summary And Action Download
Keep it real. Unless you’re being told what to do by a client, try to have a natural approach to retouching. Maybe it’s just me, but I can’t stand portraits that look fake. I have no issue with people who make significant edits but you’ve got to keep people looking real. Plastic skin, over whitened teeth, crazy eyes, and so on are just some of the telltale signs of over-editing.
To download the free action, click here. To install it in Photoshop, all you have to do is drag it into your Actions panel.
[REWIND: IMAGE DECONSTRUCTED | HOW TO SHOOT & RETOUCH A CLASSIC FASHION LOOK BY STEVEN MEISEL]
Have you seen SLR Lounge Premium yet? If you like the education offered here then I highly encourage you to check it out. It’s a fantastic service which includes a massive amount of educational content for photographers of all levels. Find it here.