Many can debate the ethical use of Photoshop, but if you strip down its use to a core idea, the editing software is meant to enhance imagery and emphasize the features through ingenuity in each image.
The age old phrase, “beauty is in the eye of the beholder” comes to mind as I watch Glyn Dewis’ video that teaches viewers how to use Photoshop to give your portrait subjects amazing eyes in three simple steps.
Step 1: Make a Selection Around the eye
Pinpoint your area of focus by selecting the eye as a whole using the Elliptical Marquee Tool, making sure to stay within the outline of the eye. Any modification in color or contrast made to the eye shouldn’t alter the clarity of the dark outline or the pupil. By pressing Q, you can create a Quick Mask Overlay that shows your desired selection, where you can remove any areas you don’t want to affect.
The harsh outline of the selection won’t blend seamlessly into the outer edges of the eye, this is where we need to feather out the selection to gradually fade the effect out. Under the Filter menu, select Blur > Gaussian Blur and dial in the pixel radius of the extent you wish to soften or feather out the selection. Now that you have fine-tuned the selection radius, focus on adjustments that will enhance the eyes.
Step 2: Blending & Color Adjustment
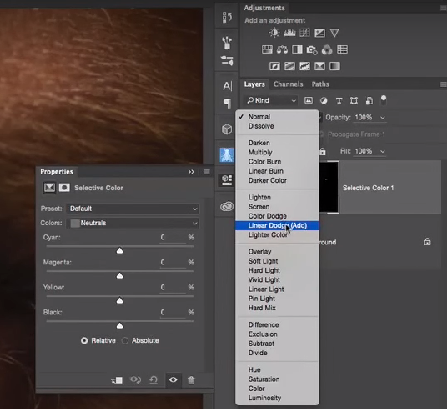
 Using a Selective Color Adjustment Layer and switch the blend mode from Normal to Linear Dodge (Add), immediately you will see a jump in brightness and contrast from the original image. Adjust the Opacity of the effect by viewing the image in full to get a realistic idea of what the eyes should look like. This adjustment layer can be used to not only brighten the eyes but to tweak and emphasize color. By selecting various Color options under the Layer Properties, you can adjust color and contrast using the sliders. The key to these modifications is to intensify the look of the eyes while still maintaining a sense of realism, always remember to make small incremental changes to avoid any drastic alterations.
Step 3: Sharpening
Add a blank layer and sharpen to bring the eyes out of the shot and emphasize the minute details within the eye. Don’t forget to select ‘Sample All Layers’ to work non-destructively, being sure to leave the other layers that you have created unaffected by the sharpening tool.
Adjust the opacity to toggle back and forth and find a balance to show precise details within the eye.
See more of Glyn Dewis’s tutorials on YouTube and check out more of his work on Instagram.

